3DXchange5 Pipeline Test Series 11: MMD Model to iClone5.4
2013.3.20 Reported by Hirospot (Personal Site)
|
All of MMD Extended Bones are managed by 3DXchange5.4 |
|
|
|
|
 印は日本語でのレポートです 印は日本語でのレポートです |
|
|
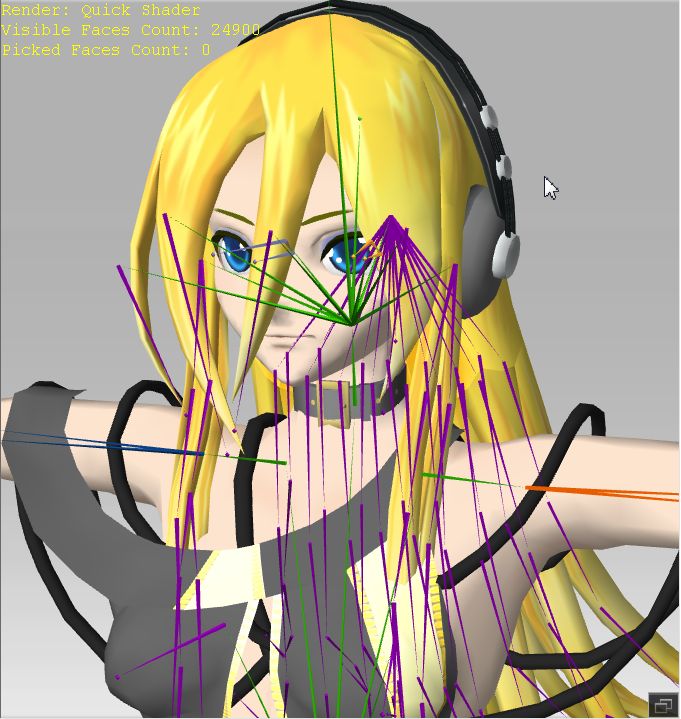 |
Bone Mapping to the Extended Bone Models is one of the newly inroduced GUI features in 3DXchange5.4 together with Powerful Facial Animation capability.
The mapping effect can be produced in three modes: translate, rotate and mixing, and further adjustments are possible depending on the nature of boned materials.
By using this new tools, each of many extended bones in hairs, clothes and accessories in MMD models became accessible and resulted to play with more natural movement in iClone5.4.
|
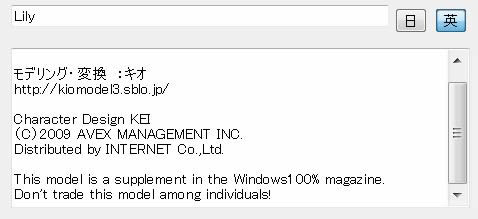 |
VOCALOID Lily, the Special Appendix Model in MMD Second Pack magazine was used in this report.
Model info is shown at the left and thankful for Mr.Kio, Mr.KEI and the company. |
(Note) This Report is a record of my personal practice and not meant as a tutorial. |
Products used in the report |
Product Version |
Notes |
| (a) PMDEditor |
0139 |
Released on 2013/3/11 |
| (b) ColladaExportPlugin.dll |
1.0.0.0 |
See Details in the Report #4 |
| (c) FBX Converter 2013 |
7.3.0 |
Autodesk FBX web site |
| (d) Live Animation |
4.30 |
See Details in the Report #8 |
(Note) FBX file of MMD models can be obtained by using (a)+(b)+(c) or (d) |
| 3DXchange5 Pipeline |
5.4.1511.1 |
Reallusion (5.4 New Features) |
| iClone5 Pro |
5.4.2706.1 |
Reallusion (5.4 New Features) |
| CrazyTalk 6 Pro |
6.21 |
Reallusion |
|
|
| |
1 |
PMDEditor and FBX Exporting |
1.1 |
Preparing MMD model with Extended Bones |
| |
1) Create FBX file for Lily. The procedure is written in my previous report. (#4, #6) |
| |
PMDEditor : Model Appearance
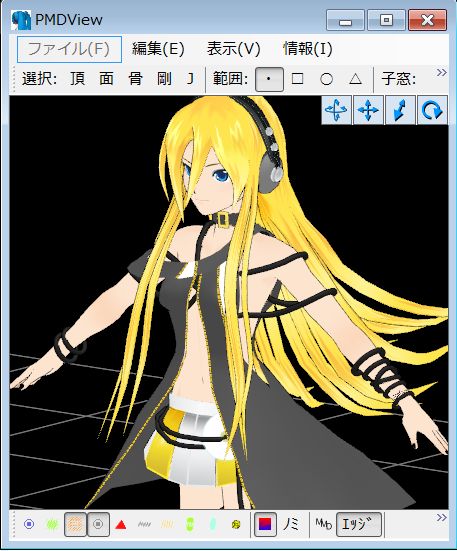 |
PMDEditor : Bones in the Model
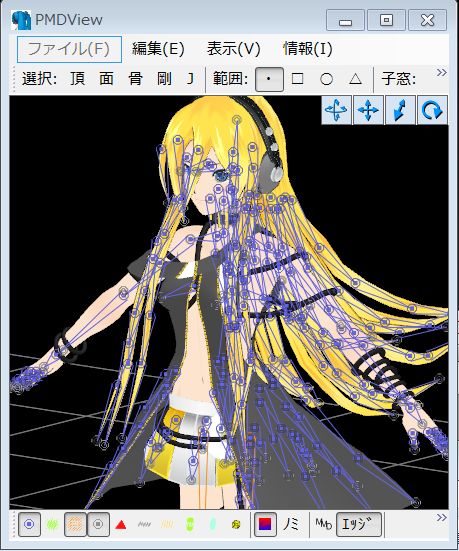 |
|
2 |
Using 3DXchange5.4 |
|
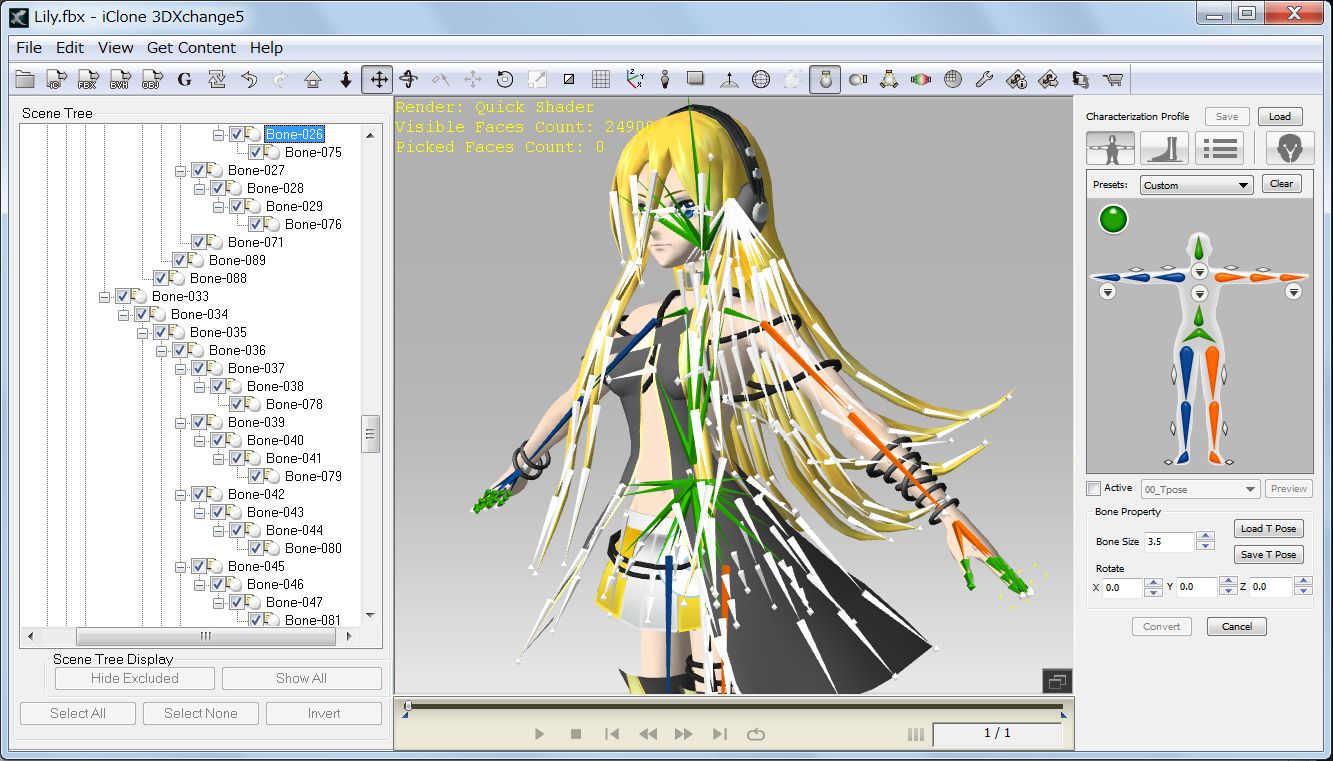
1) Open 3DX5.4. Go to File/Open and import MMD Model FBX file. (Lily.fbx) |
| |
2) Adjust Materials for all the body parts. |
| |
Use dropper tool (Pick) to identify materials. Set Specular value to 0.
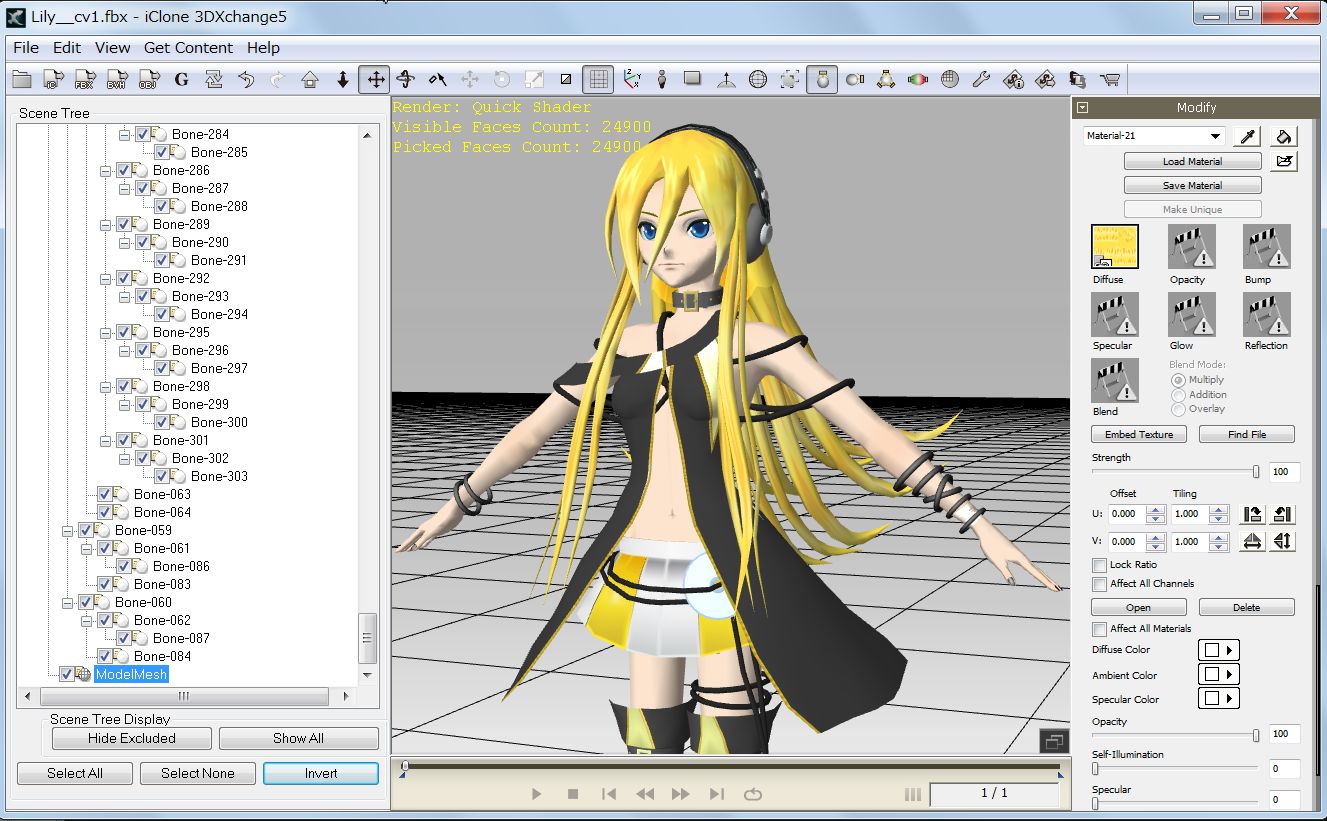 |
2.1 |
Characterization |
|
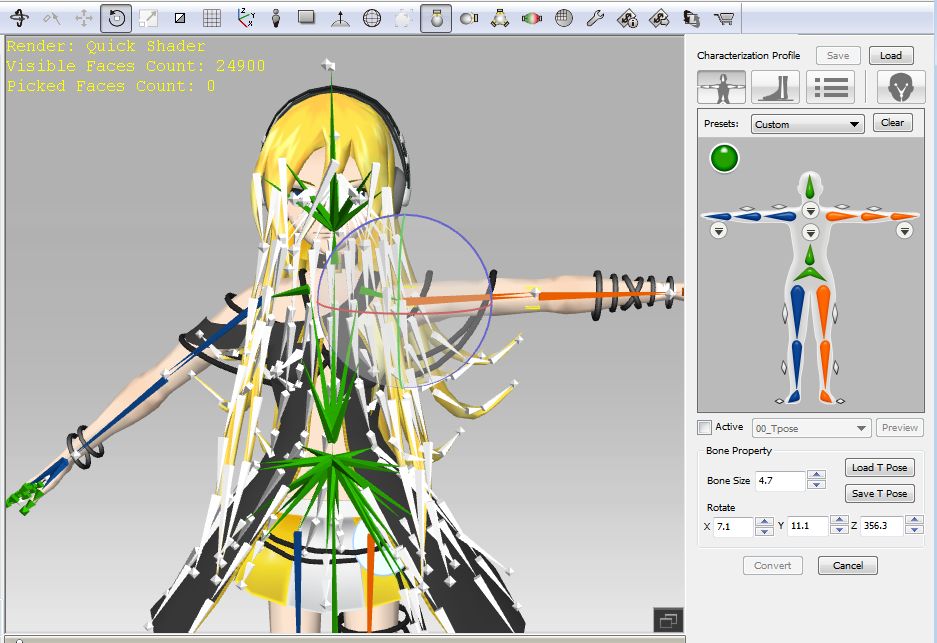
1) Go to Modify/Character(N)/Character Setup and click 'Convert to Non-Standard' button. |
| |
2) Set Presets for Custom, map iClone bones to only basic bones in MMD Model. |
| |
3) Use Dummy tool to size the model. Adjust Bone Size to around 2 to 4. |
| |
|
| |
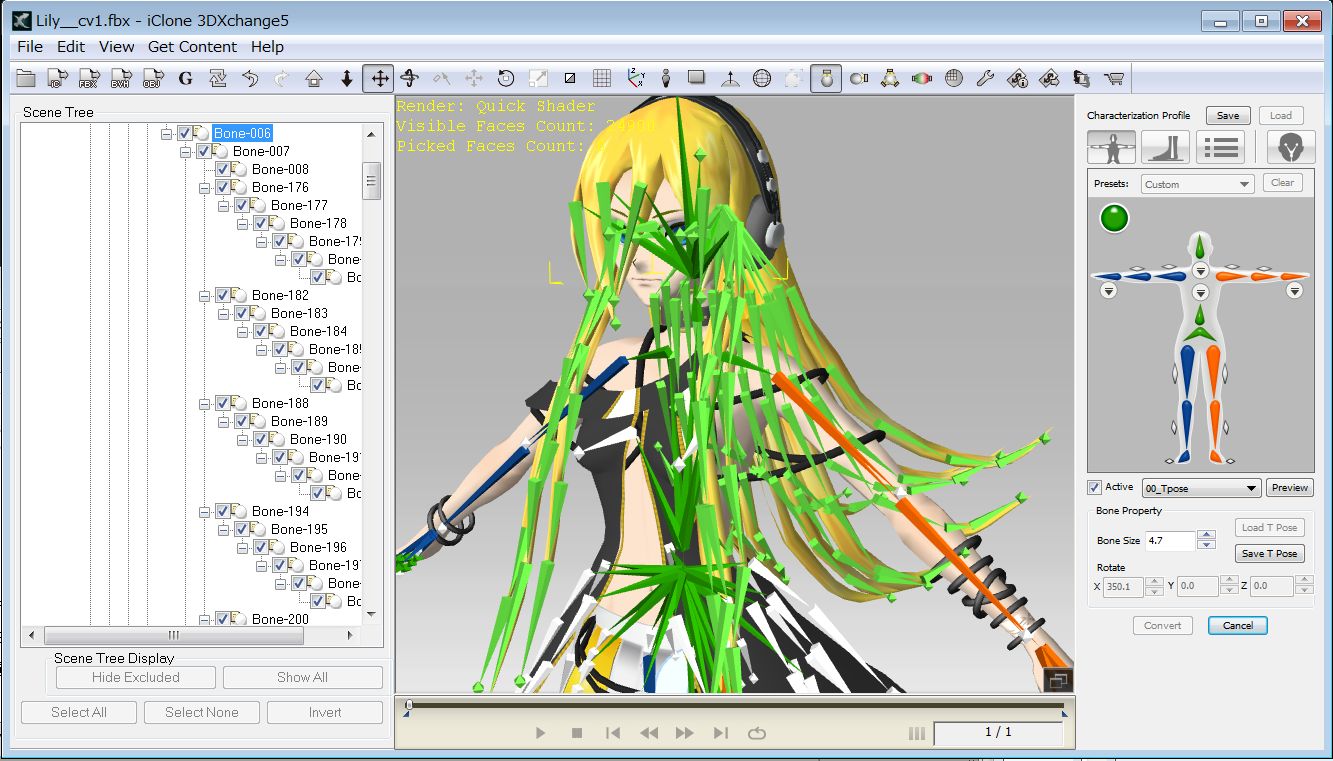
4) Check Active. |
| |
|
| |
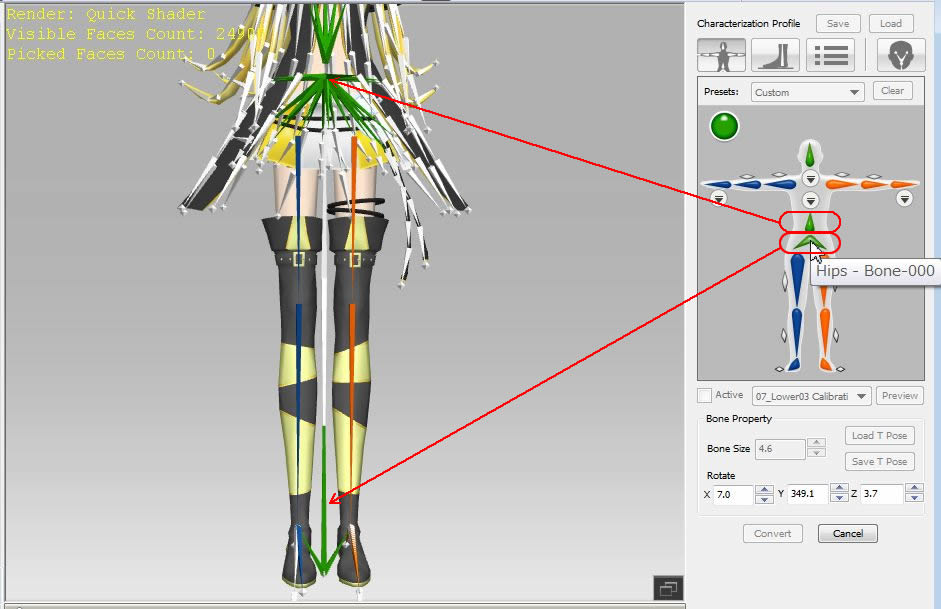
5) Hip bone alart |
| |
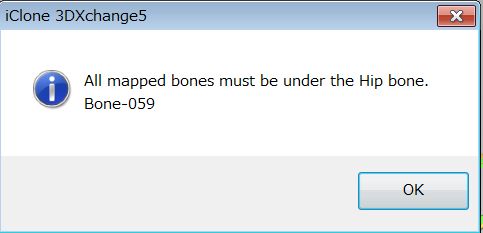 |
If the following notice is appared at checking on'Active', uncheck and change the Hips-Bone-000 mapping as shown below. |
|
| |
|
| |
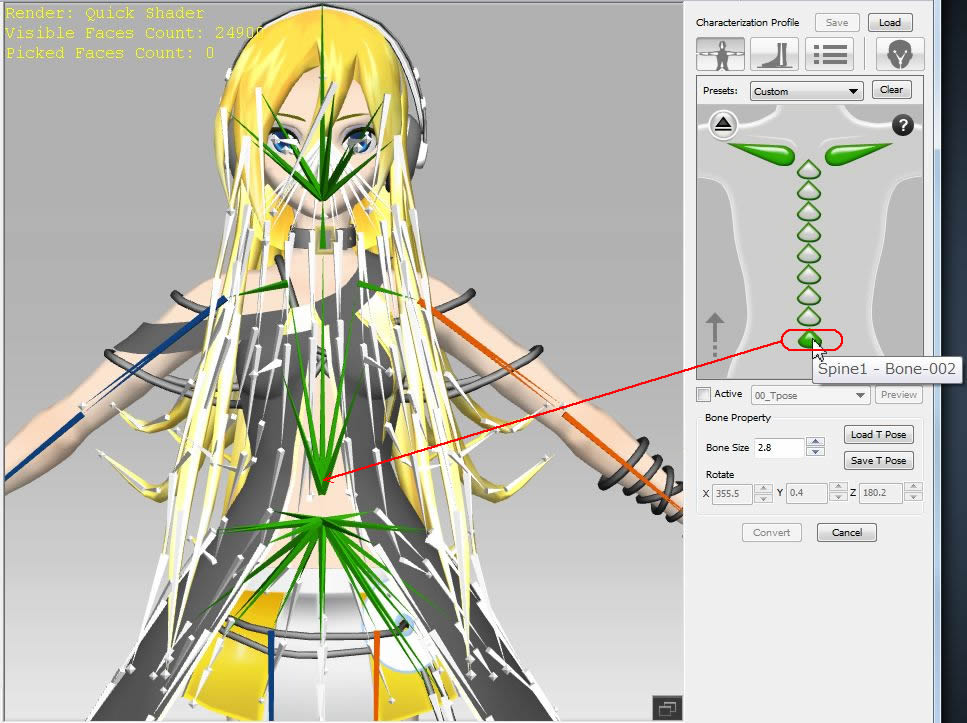
6) Open 'Spine Page' and apply "Spine1- Bone-002" to MMD model bone. |
| |
|
| |
7) Select Upper Arm bone and make a T-Pose. |
| |
|
| |
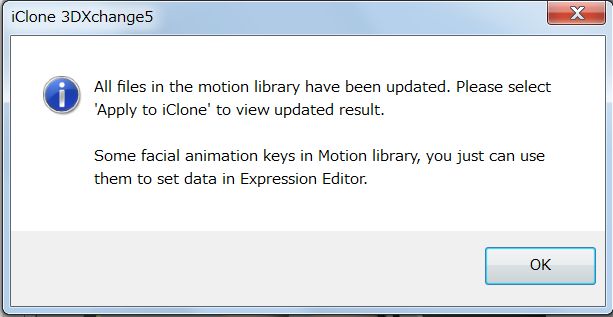
8) Click 'Convert' button. Follwing message will appear. Click 'OK' button. |
| |
|
| |
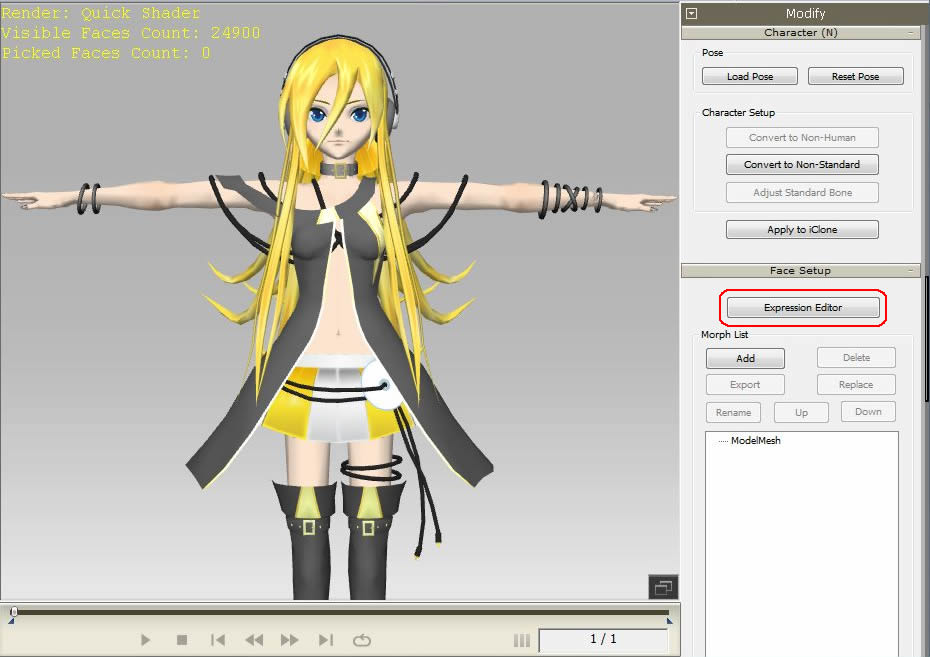
9) When Characterized, Face Setup/'Expression Editor' button will appear. (New) |
| |
|
| |
|
2.2 |
Face/Extended Mapping (New) |
| |
【Comment】
Following works are written by each body part basis for clarity.
Complete mapping to all of Extended bones first and Convert, then, select each bone part for each setting in Edit Spring stage for efficiency. |
|
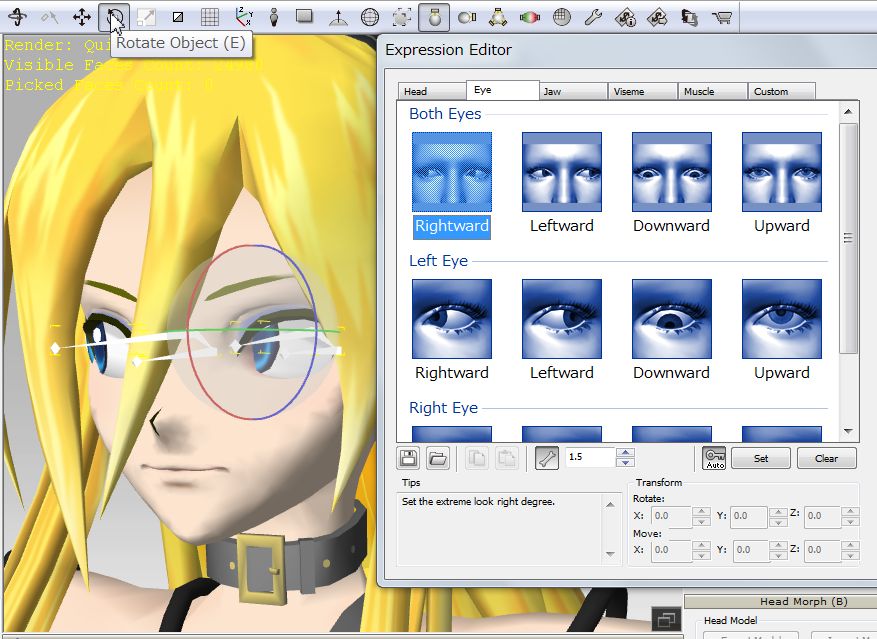
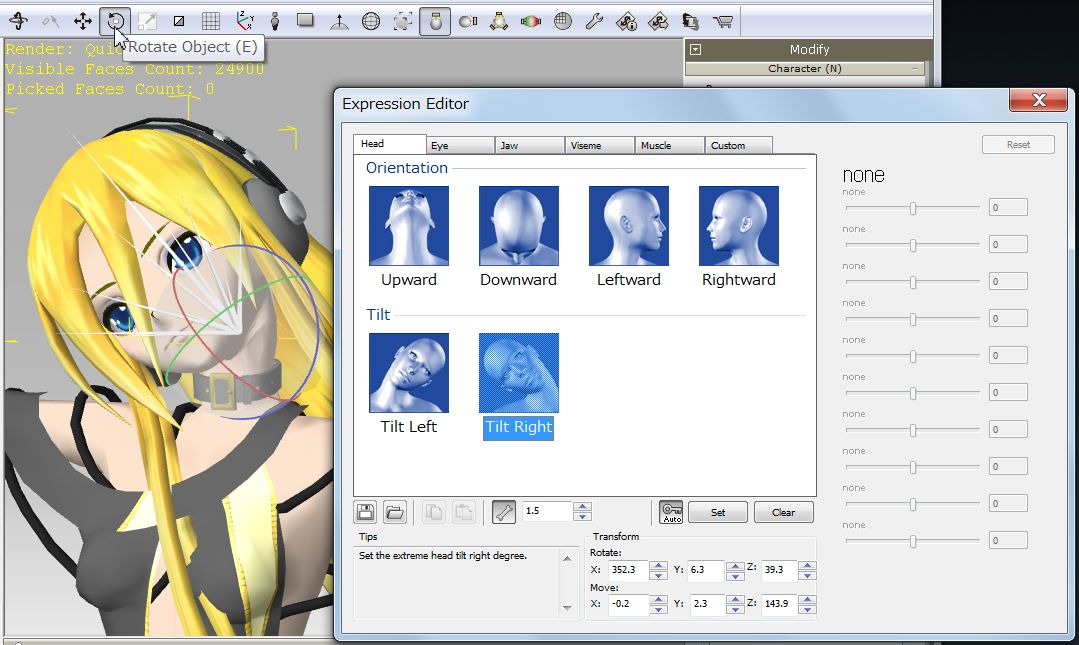
(1) |
Face Setup/Expression Editor |
| |
1) Click 'Expression Editor'. Select Orientation in the 'Head' tab. |
| |
Use 'Rotate Object' and click 'Set' button after each angle is set.
|
(2) |
Eyes expressions setting by Expression Editor |
| |
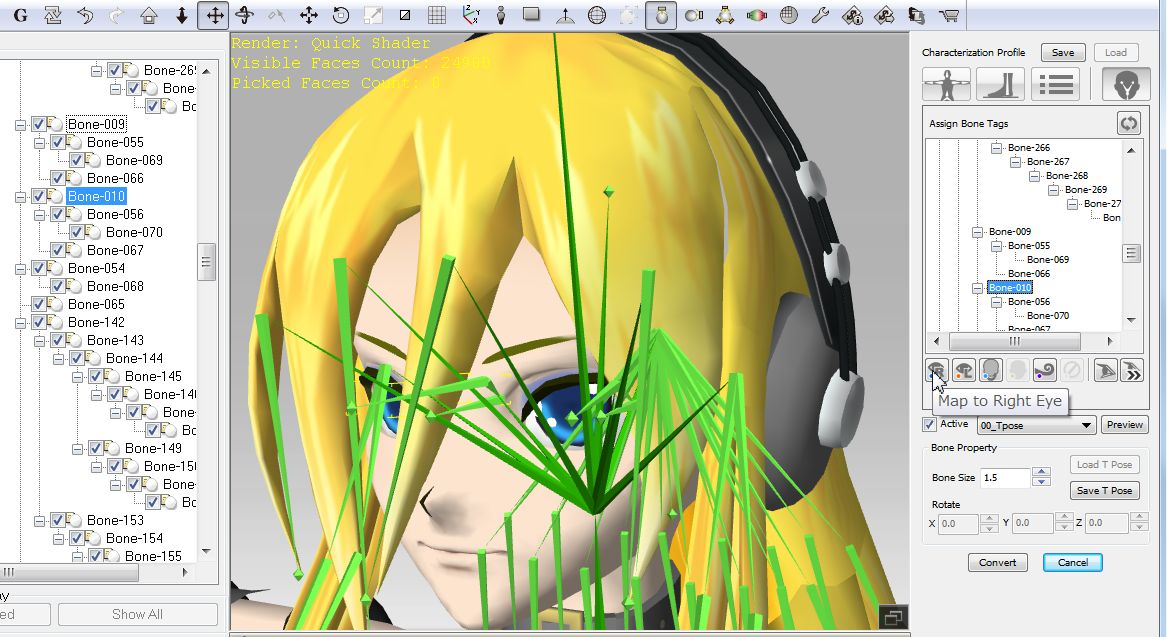
1) Map to Right and Left Eyes |
| |
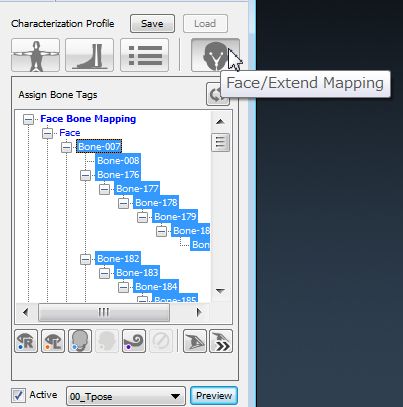
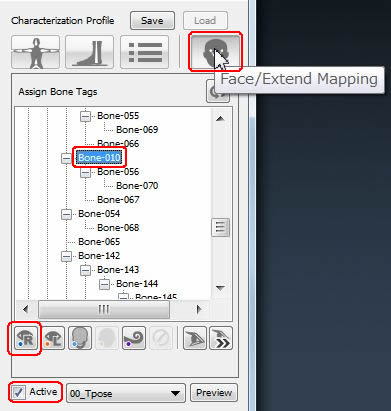
Characterization Profile (New)
|
Steps to make Eye Expression
0) Click 'Bone Mapping' icon
1) Click the 'Face/Extend Mapping' icon
2) Check Active
3) Select Right eye bone: Bone-010
4) Click 'Map to Right Eye' icon.
5) Click 'Convert'.
6) Repeat from 0 to 5 for Left eye bone: Bone-009
7) Go to Modify/Face Setup/Expression Editor |
|
| |
|
| |
2) Click 'Expression Editor'. Select Both Eyes in the 'Eye' tab and use 'Rotate Object' for each limit. |
| |
|
| |
3) Go back to Modify/Convert to Non-Standard. |
| |
|
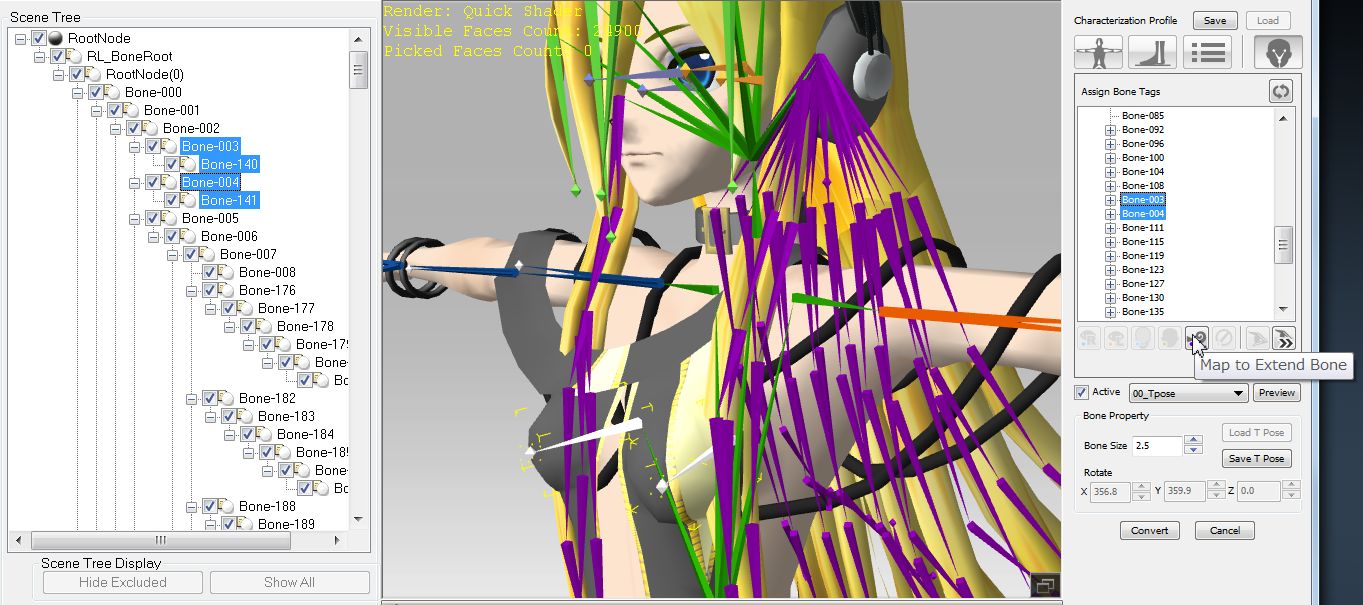
(3) |
Spring Type:Translate (for Breasts) |
| |
1) Select Bone-003/114, 004/141 for Breasts, Click 'Map to Extend' button. |
| |
|
| |
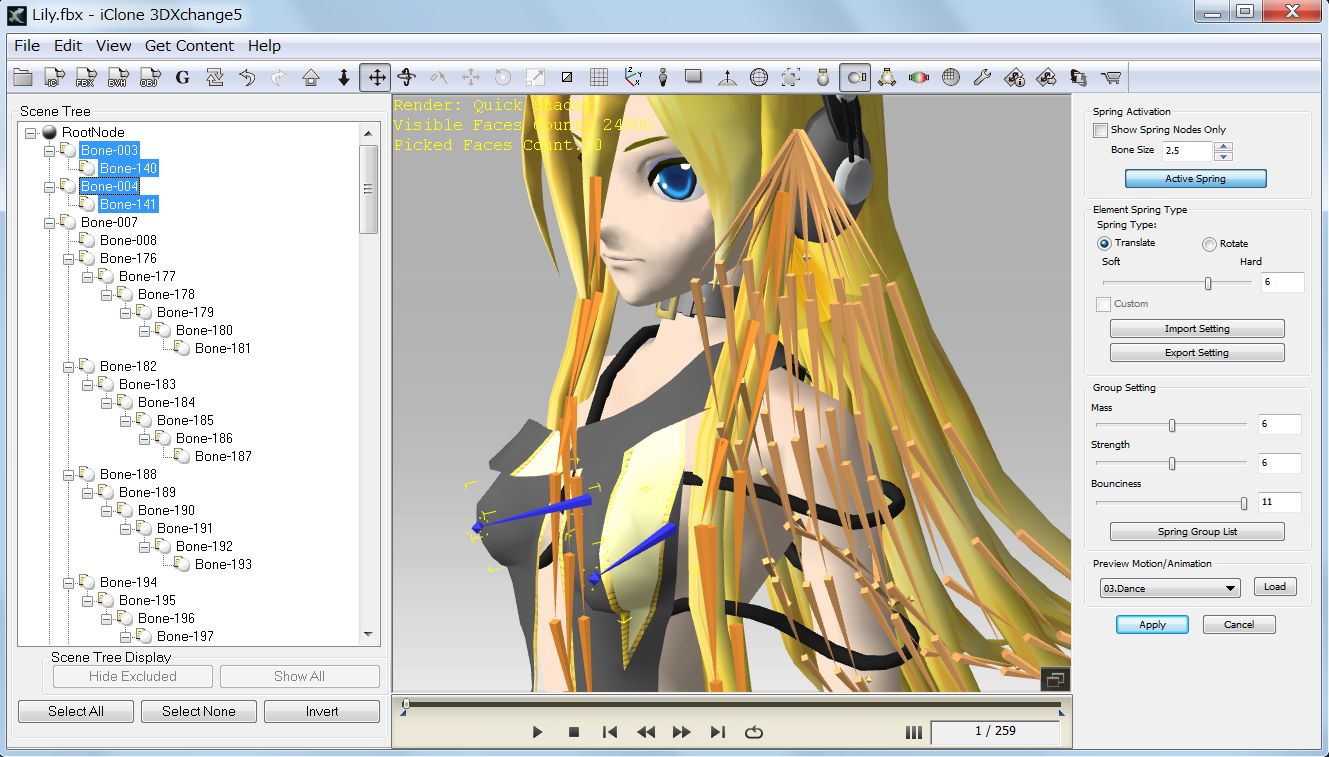
2) Click 'Convert' button, then go to Modify/Spring. |
| |
3) Click 'Edit Spring', select the same bone Bone-003/114, 004/141. |
| |
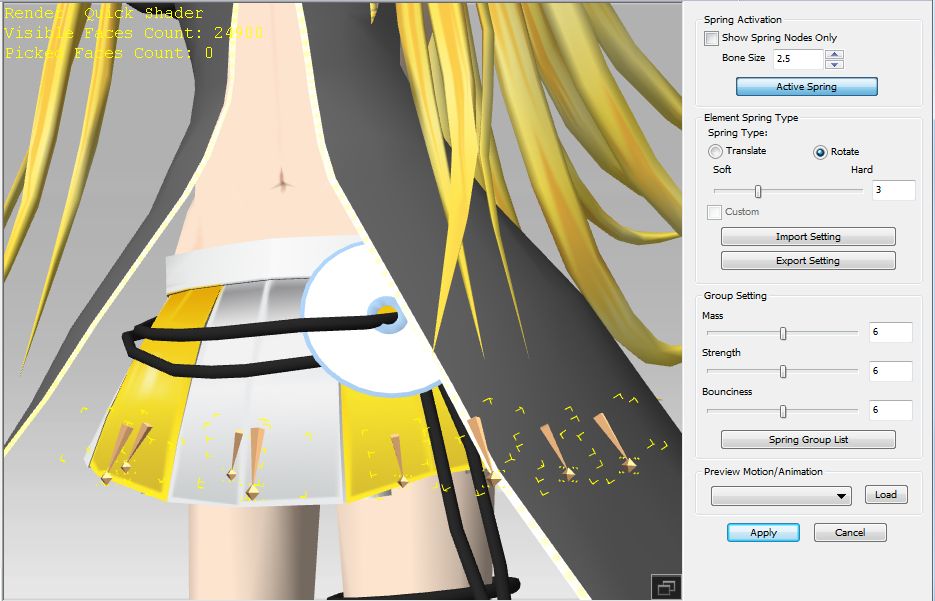
4) Click 'Active Spring' button, Select 'Translate' and set the dial to 6, tentatively. |
| |
|
| |
5) Try Preview Moion 03.Dance.
Further adjustment : Tentative value of the Group Setting Mass/Strength/Bounciness=6/6/11. |
| |
6) Prefered Final Settings: Translate' dial at 6, Mass/Strength/Bounciness=6/5/11. |
| |
|
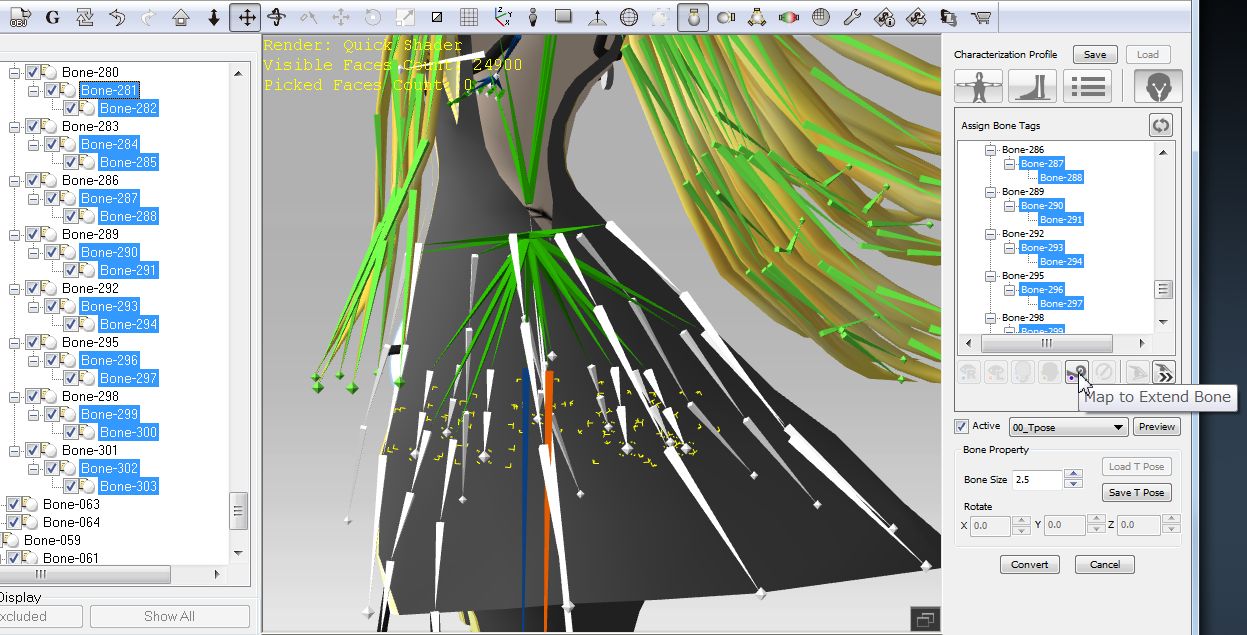
(4) |
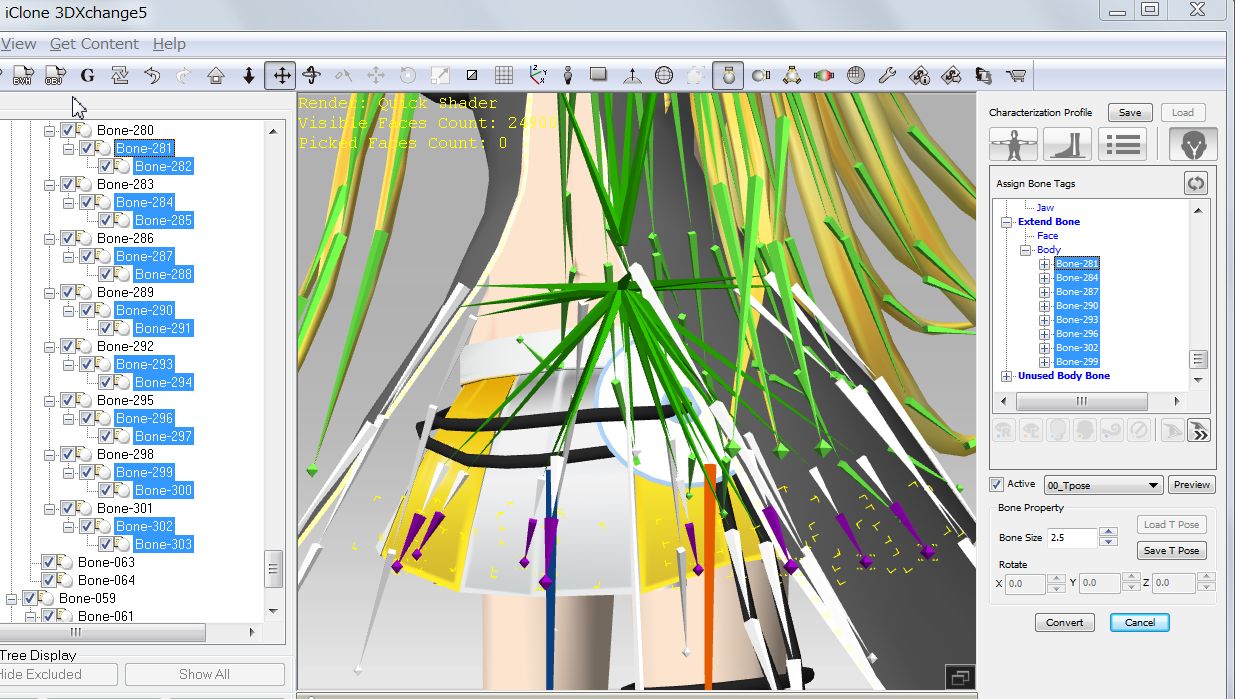
Spring Type: Rotate (for Short Skirt) |
| |
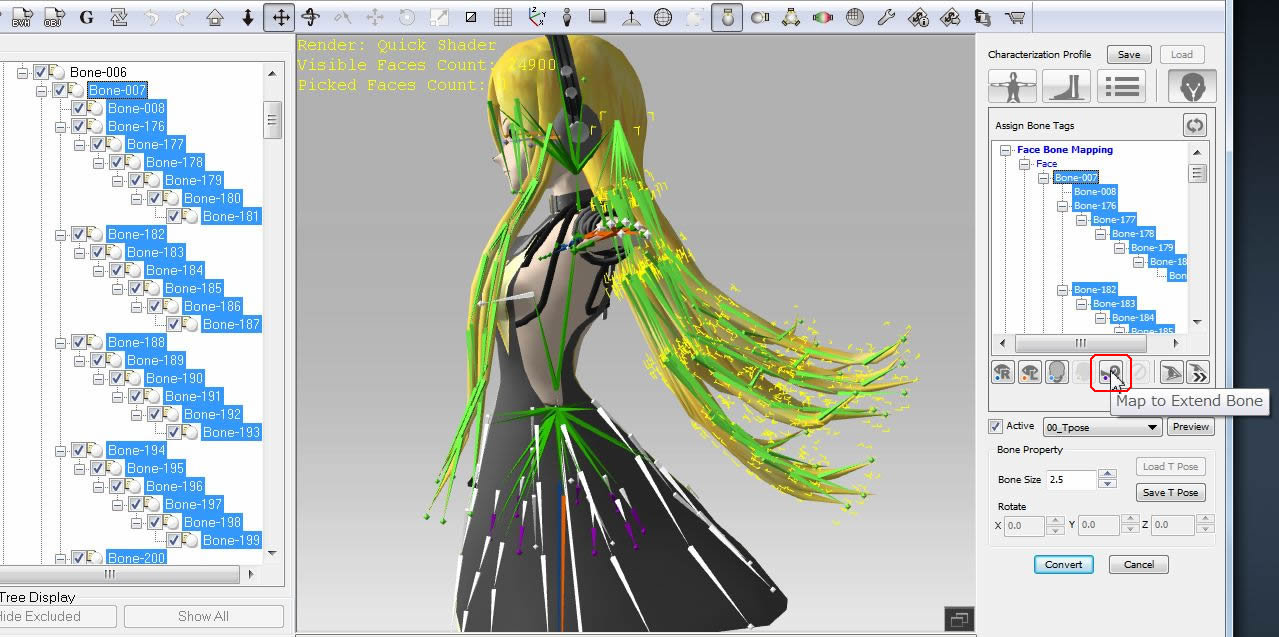
1) Click 'Face/Extended Mapping' icon and select skirt bones for only hem side (lower side). |
| |
Use Ctrl button to select multiple bones.
Selected bones: Bone-281/282, 284/285, 287/288, 290/291, 293/294, 296/297, 299/300, 302/303 |
| |
|
| |
2) Click 'Map to Extended Bone' icon. Selected skirt bones should turn to purple color. |
| |
|
| |
3) Click 'Convert' button. The same iClone message will appear. Click 'OK'. |
| |
4) Go to Modify/Spring and click 'Edit Spring' button. |
| |
5) Select the same skirt bones Bone-281 through 303 again. |
| |
|
| |
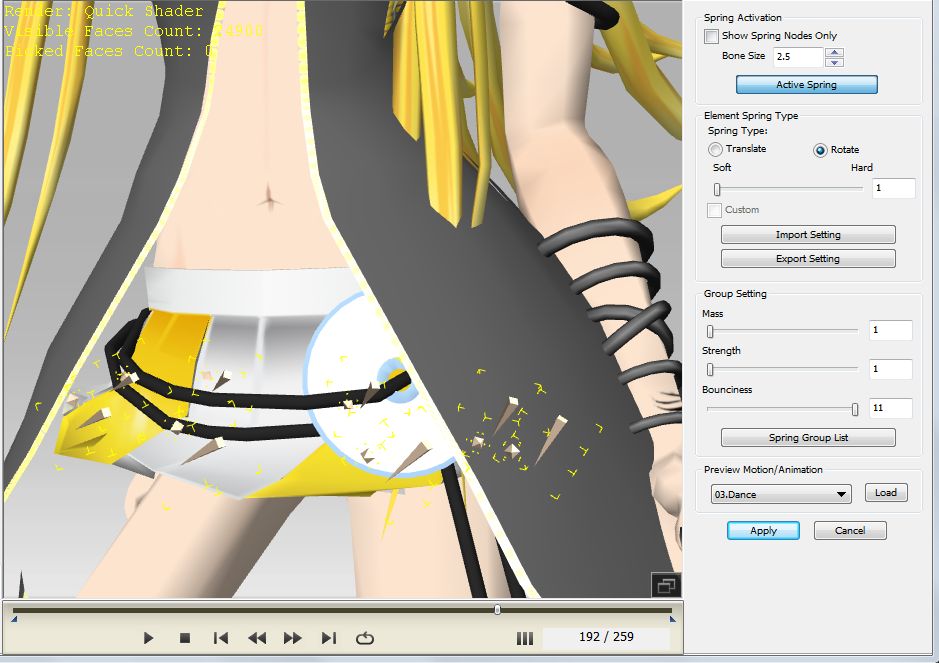
6) Push 'Active Spring' button. |
| |
7) Select Spring type of 'Rotate' and set the slider bar to 1 between Soft and Hard. |
| |
|
| |
8) Use Preview Motion/Animation: Select 03.Dance and Preview the effect on the skirt. |
| |
|
| |
9) Further adjustment with Group Setting:
Final value of the Mass/Strength/Bounciness=1/1/11. |
| |
10) Click 'apply' button. |
| |
|
|
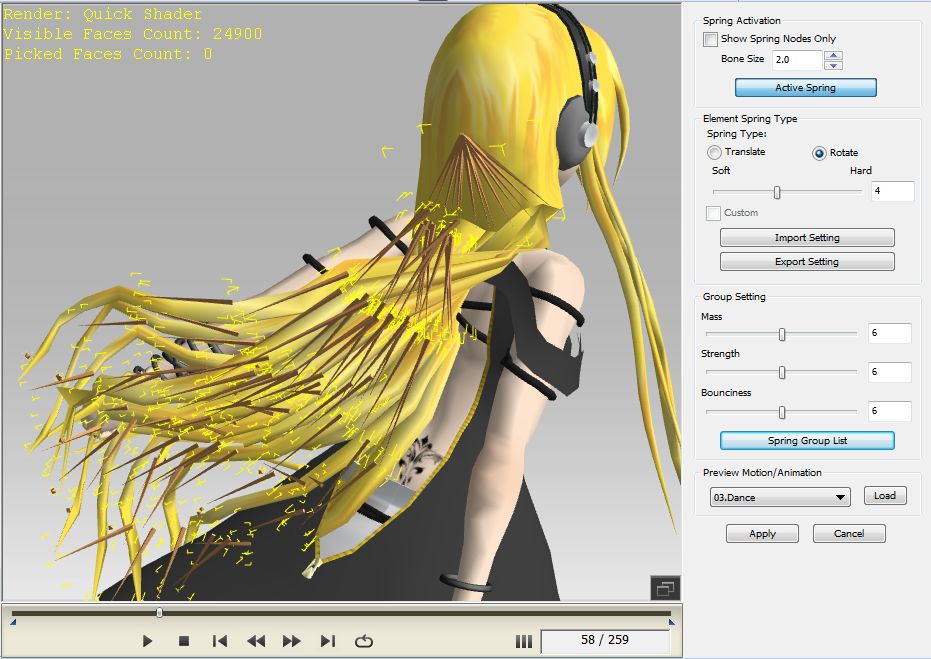
Spring Type: Rotate (for Hair) |
|
1. Long hair |
| |
1) Go to Modify/Character and click 'Convert to Non-Standard again. |
| |
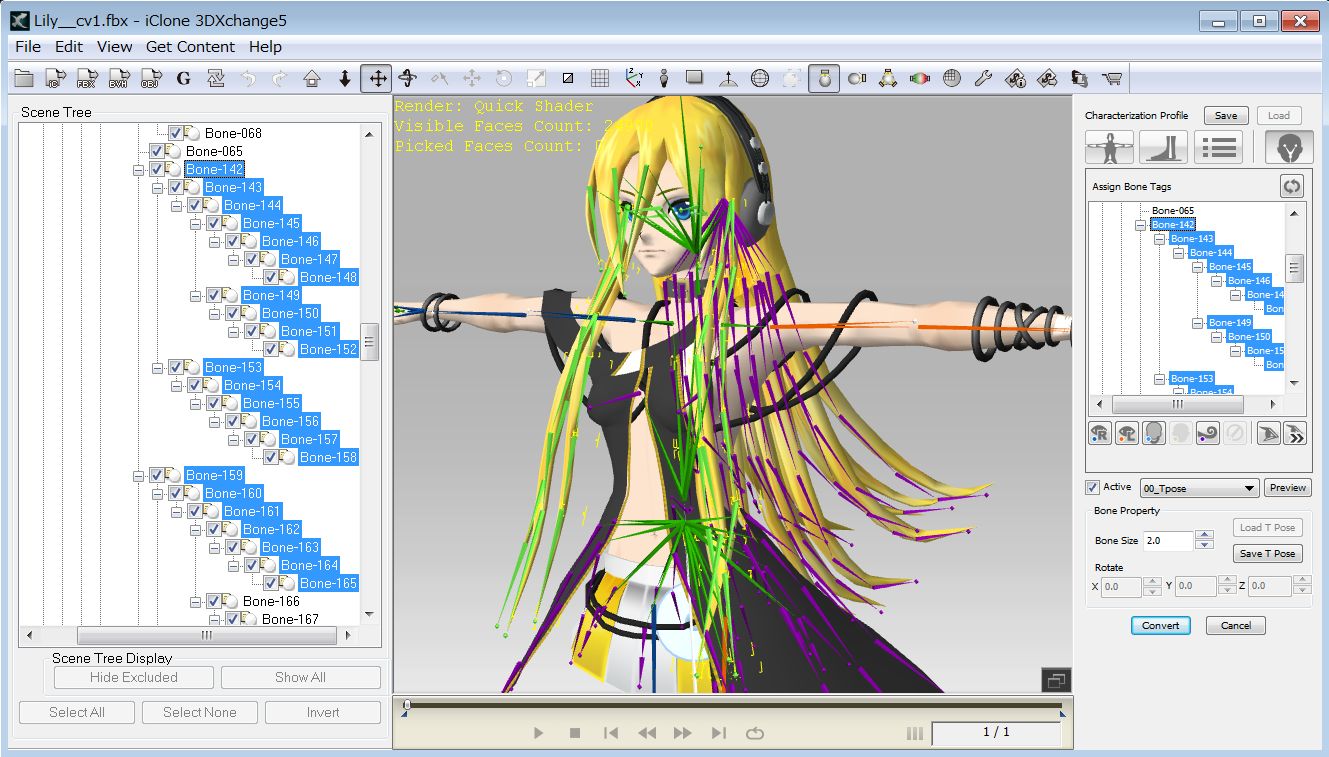
2) Click 'Face/Extended Mapping' icon and select all bones for her back hair: Bone-007 to 271. |
| |
|
| |
3) Click Bone-007, keep pushing Shift key and click Bone-271 to select all hair bones at the same time |
| |
|
| |
4) Click 'Map to Extended Bone' icon. All hair bones turn to purple color. |
| |
|
| |
5) Click 'Convert' button. |
| |
 |
Reminder will open, click OK button.
|
|
| |
6) Go to Modify/Spring and click 'Edit Spring' button. |
| |
|
| |
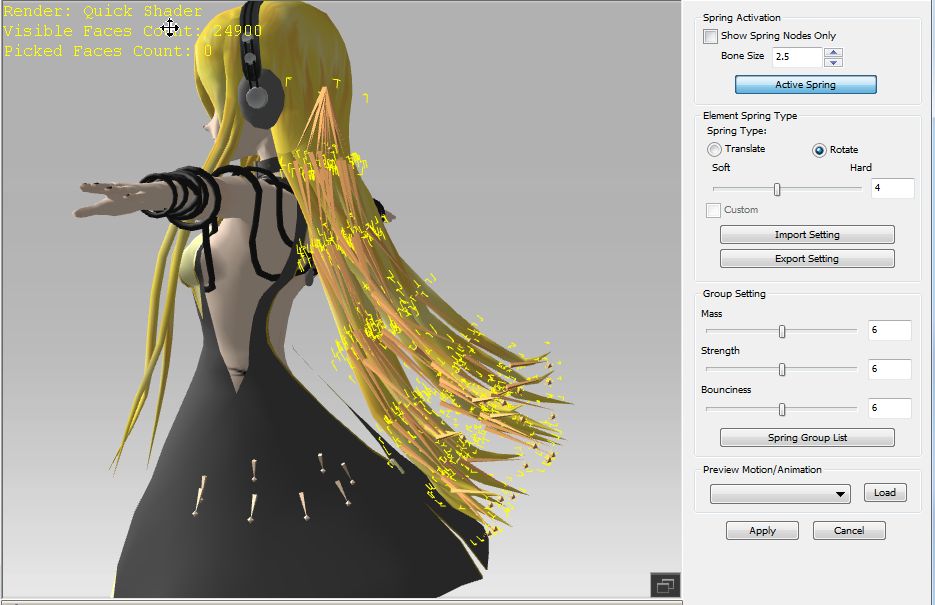
7) Select all the same hair bones Bone-007 to 271 again and push 'Active Spring' button. |
| |
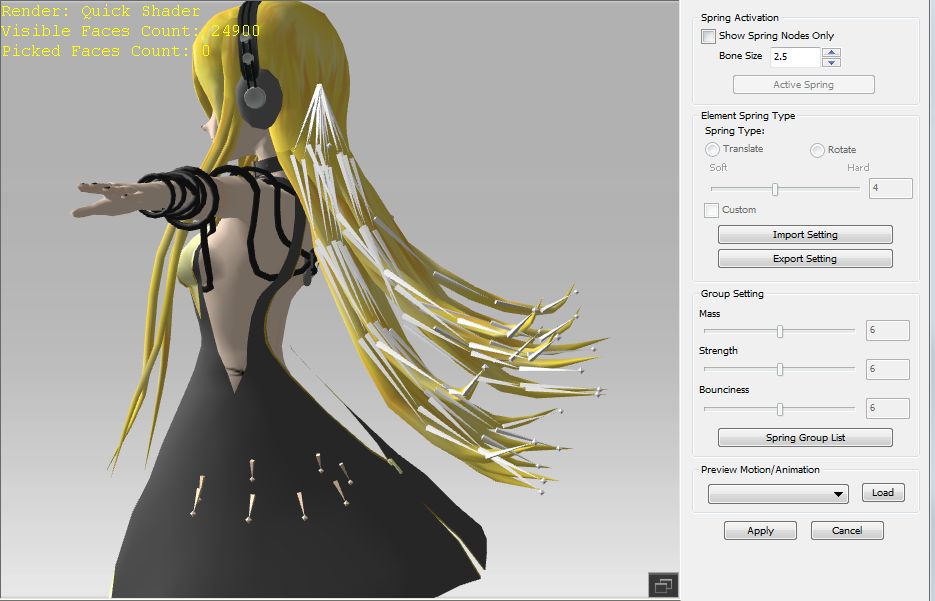
8) Select Spring type of 'Rotate' and set the slider bar to 4 between Soft and Hard. |
| |
|
| |
9) Go to Preview Motion/Animation and apply such as 03.Dance and 04.Catwalk. |
| |
|
| |
10) Further adjustment by Group Setting: Final value of the Mass/Strength/Bounciness=5/3/6. |
| |
11) Push 'Apply' button. |
| |
|
|
2. Front Hair (Trailed) |
| |
1) Select Bone-142 through 158 and Bone-159 through 175 and use the same procedure for the front long hair. |
| |
|
| |
2) Select Spring type of Rotate, apply 03.Dance and determin the slider value. Then click 'Apply'. |
| |
|
|
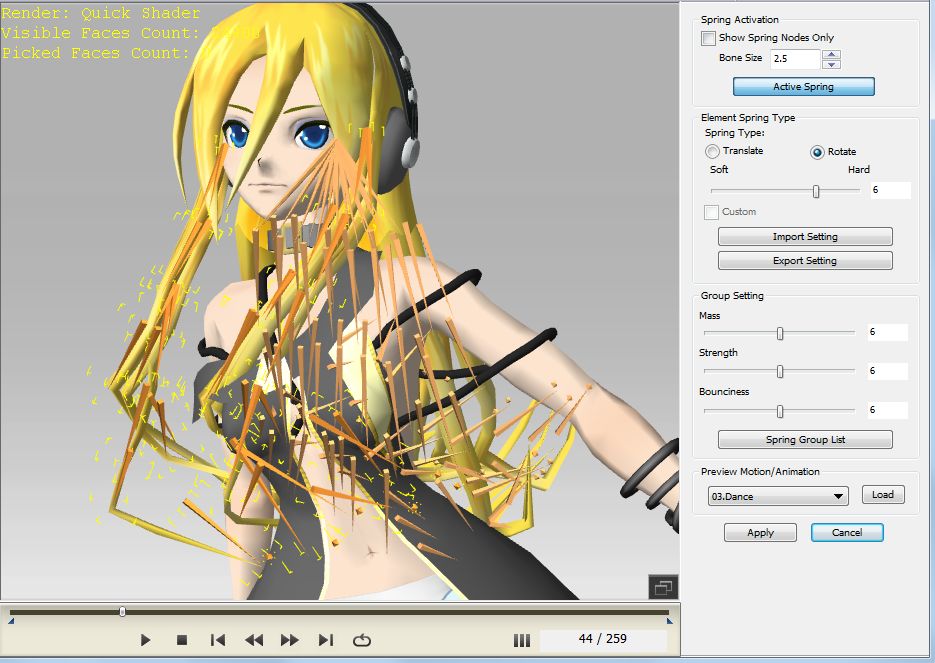
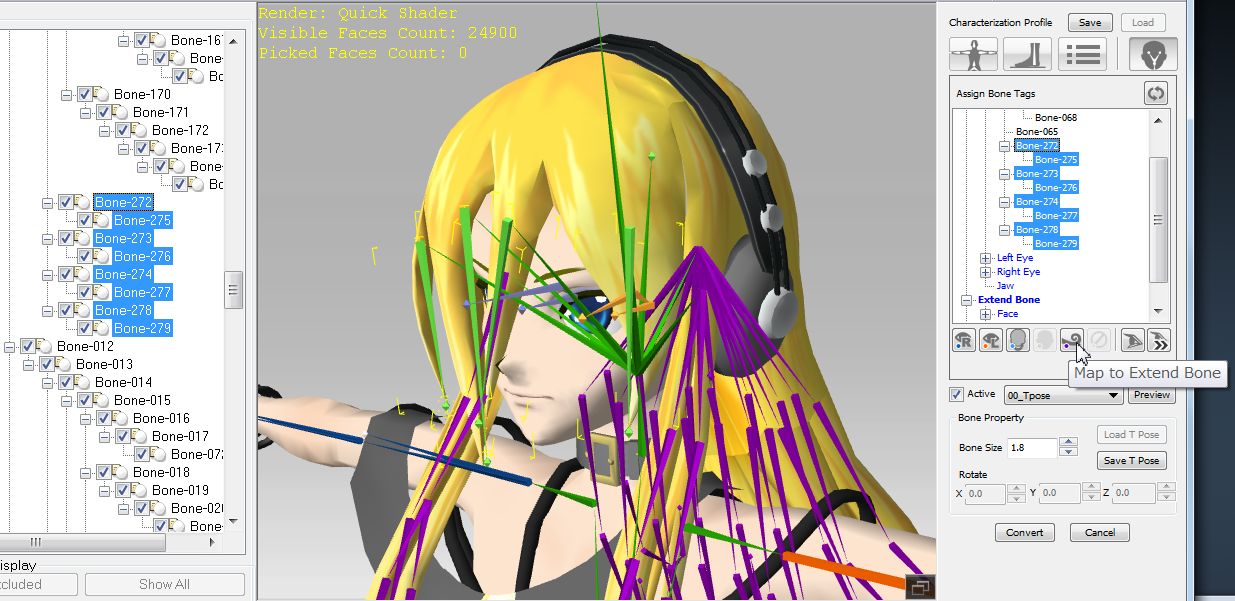
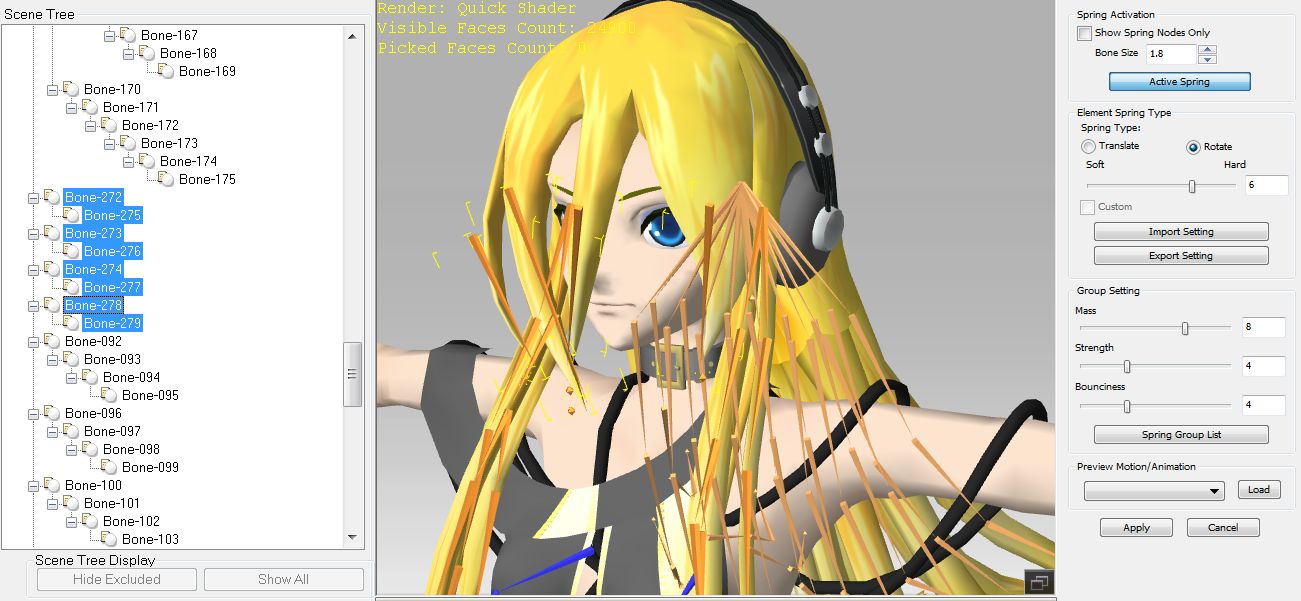
3. Front Hair (Forehead) |
| |
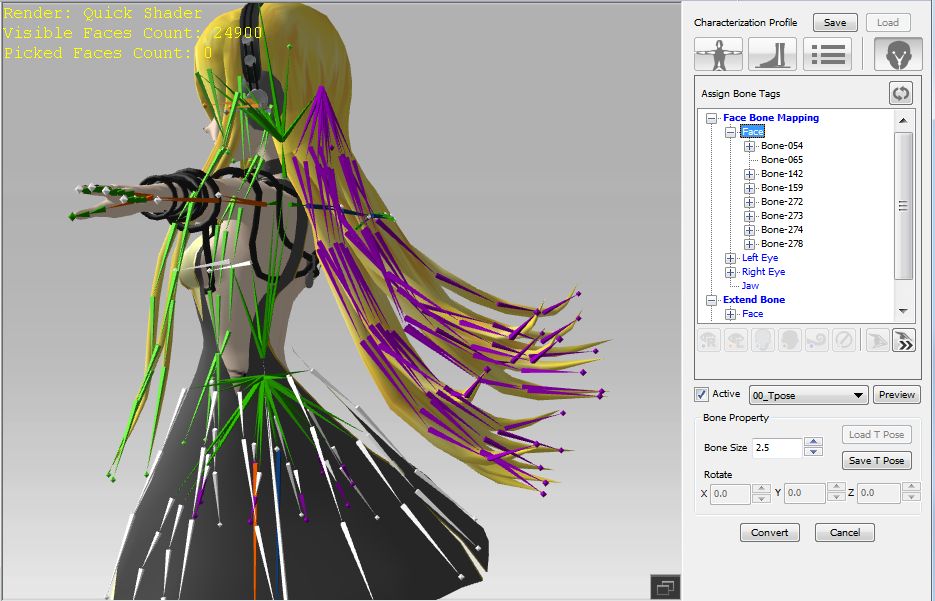
1) Select Bone-272 through 279 and click 'Map to Extend Bone' icon. |
| |
|
| |
2) Click Convert7 button and Go to Modify/Spring. |
| |
3) Select Bone-272 through 279 again and click 'Active Spring' button. |
| |
4) Select Spring Type as 'Rotate' and set the Soft/Hard value at 6.
Group Setting M/S/B=8/4/4.
|
| |
|
| |
5) Click 'Apply'. |
| |
|
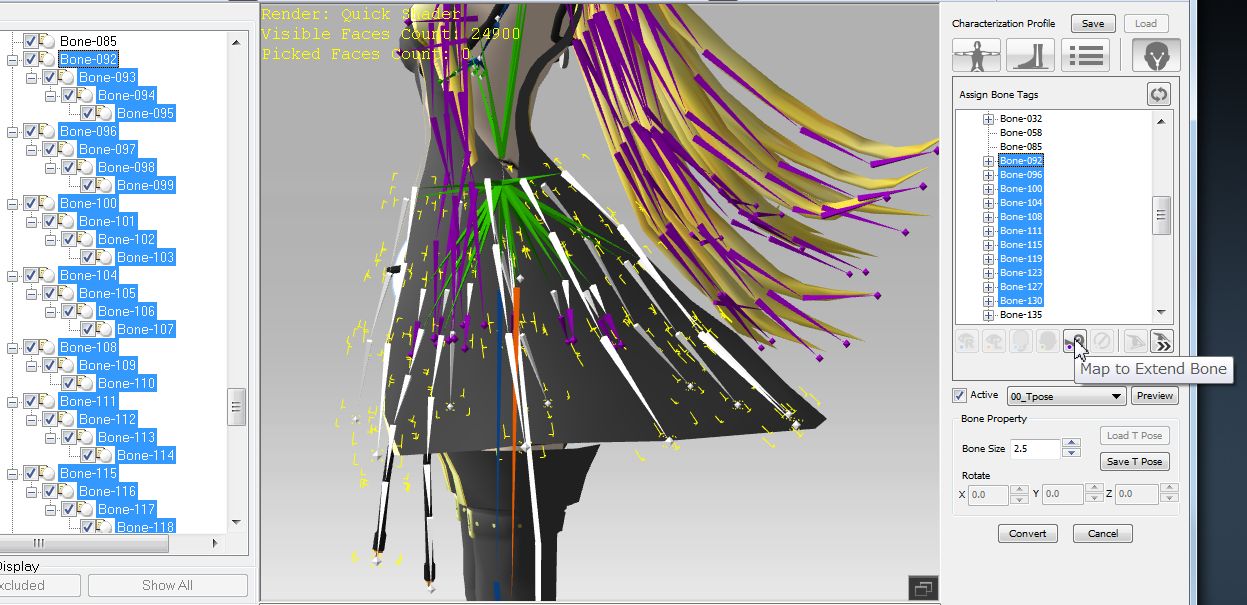
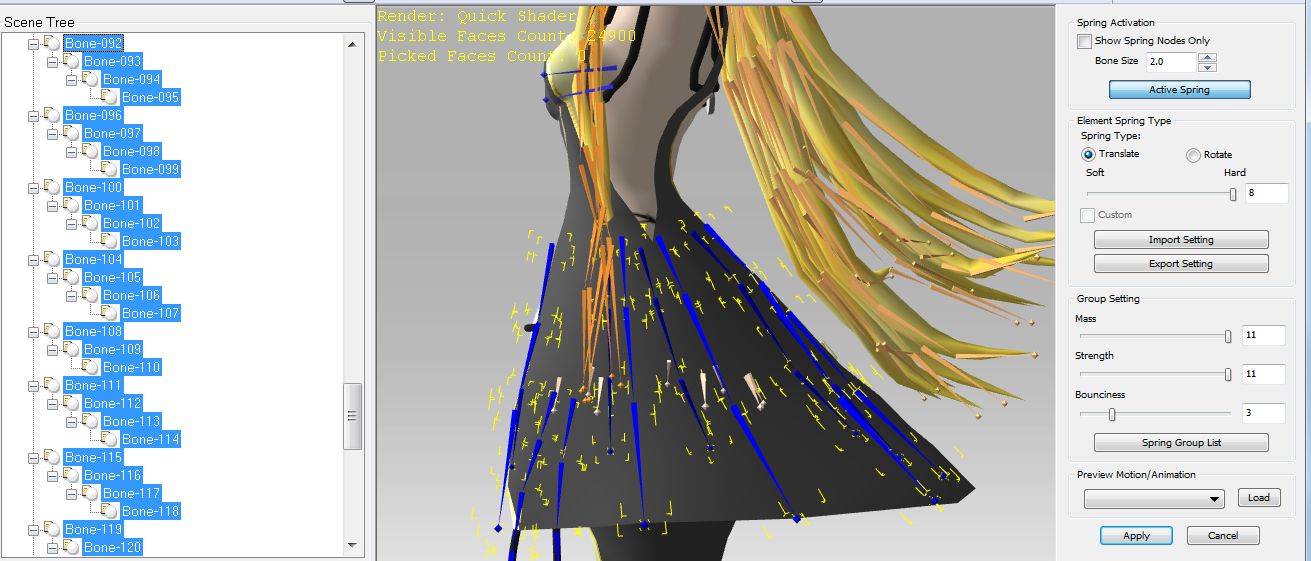
(6) |
Spring Type:Mixing (New) (for Jacket) |
| |
1) Go to Modfy/Character(N)/Character Setup and push "Convert to Non-Standard" button again. |
| |
2) Confirm bones for Jacket from Bone-092 through 139. 'Map to Extended Bone' icon. |
| |
3) Confirm also the 'Map to Extended Bone' icon. |
| |
|
| |
4) Bone type and stiffness of each bone element in a chain are editable in the 3DXchange5,4. |
| |
|
| |
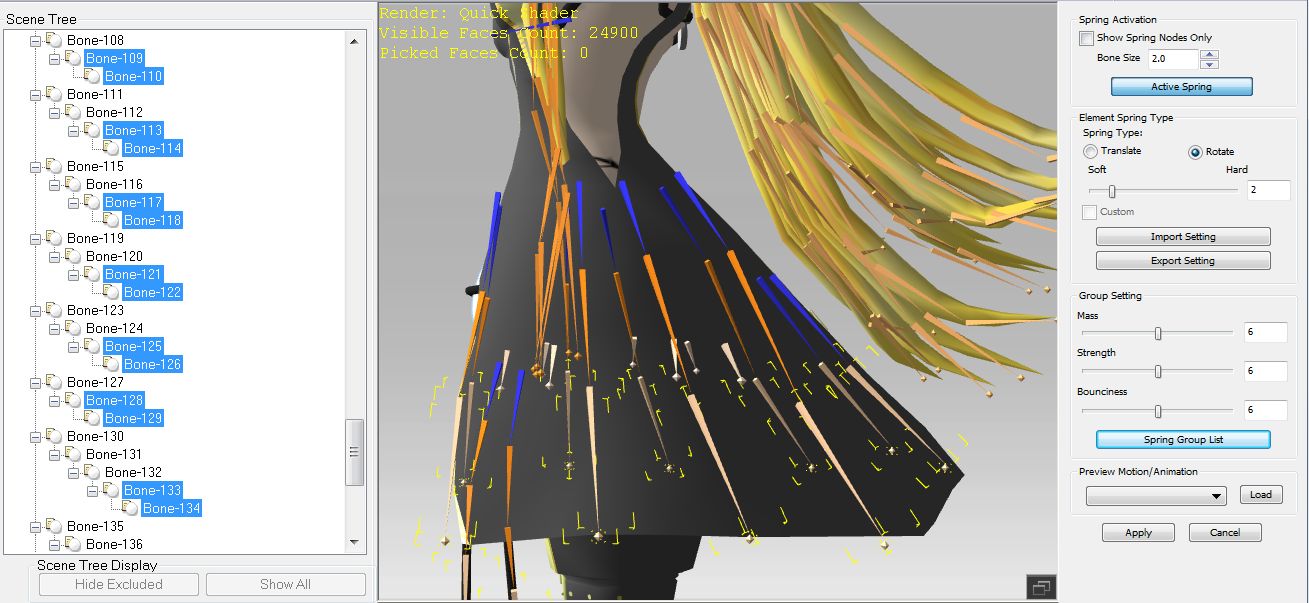
1. Changing the Type and Soft/Hard value on each bones |
| |
Level-1
1) At Characterization stage, select bones Bone-092. 096, 100, 104, 111, 115,119, 123, 130, 135 again, click 'Map to Extend Bone'. click 'Convert'.
2) Go to Modify/Spring, select the same bones,
3) Click 'Active Spring' and select 'Translate'. Set slider at 6. |
| |
Level-2
1) Select Bone-093, 097, 101, 105, 112, 116, 120, 124, 131, 136&137.
2) Click 'Active Spring' and select 'Rotate'. Set slider at 7. |
| |
Level-3
1) Select Bone-094/095, 098/099. 102/103, 106/107, 109/110, 113/114, 117/118, 121/122, 125/126, 128/129, 133,134.
2) Click 'Active Spring' and select 'Rotate'. Set slider at 2. |
| |
|
| |
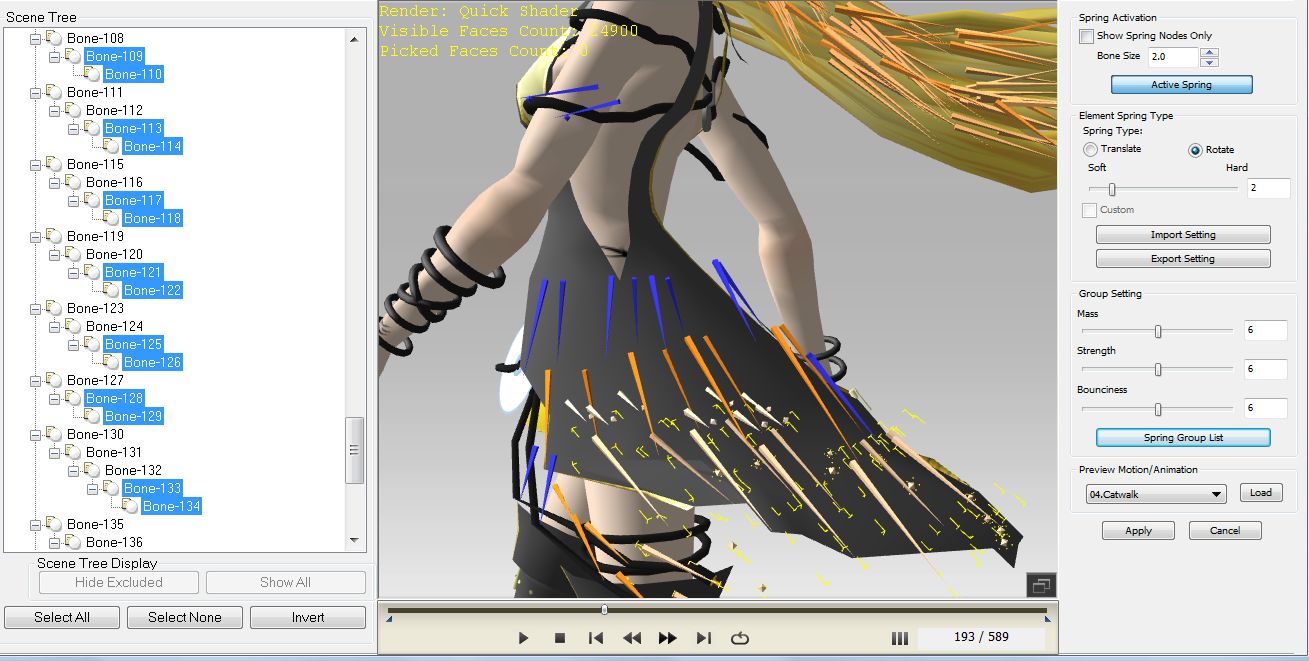
3) Go to Preview/Motion and apply 03.Catwalk and observe the Gown movement. |
| |
|
| |
4) All the settings are set. Push 'Apply' botton when completed. |
| |
5) Go to Character(N) and push 'Apply to iClone' button. |
| |
(Note) |
| |
When the result is not satisfactory, try different settings for Jacket. |
| |
1) Select Bone-092 through 139, Select Spring type as 'Translate', Set the S/H slider at 7. |
| |
2) Apply further Group Setting M/S/B=11/11/3. |
| |
|
| |
3) Push 'Apply' botton when finished and go to Character(N). Push 'Apply to iClone' button. |
| |
|
|
iClone5.4 |
| |
(Note)
When a model is applying from 3DXchange5.4, specified iClone5.4 must be installed, otherwize following Reminder will appear. |
| |
|
| |
|
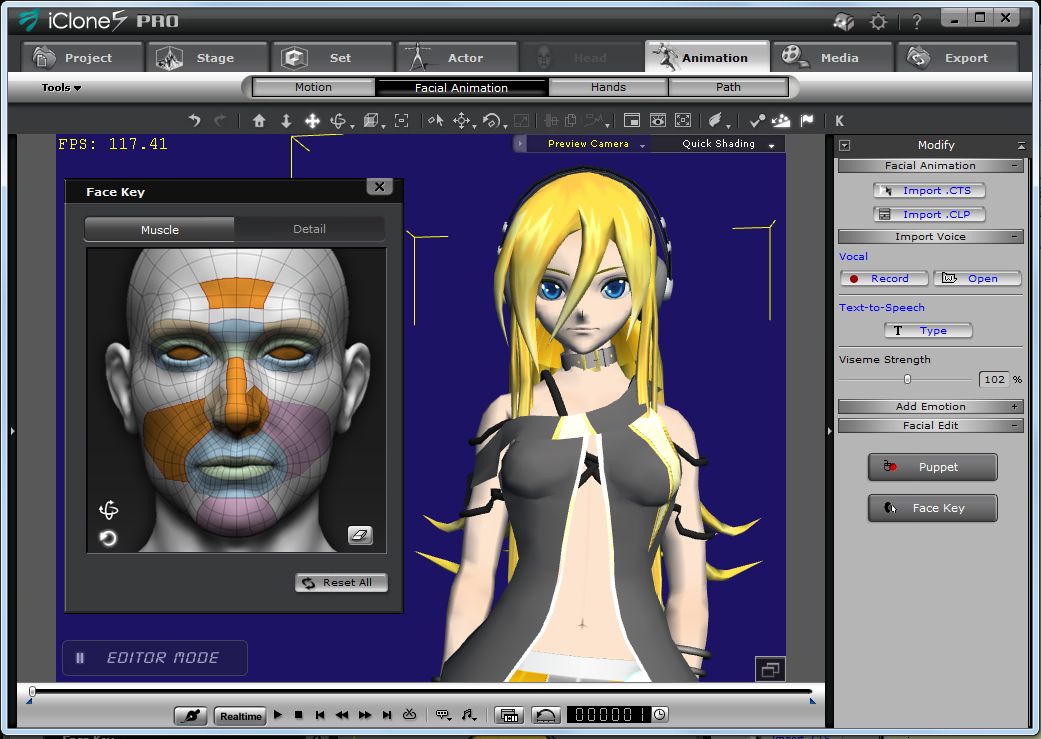
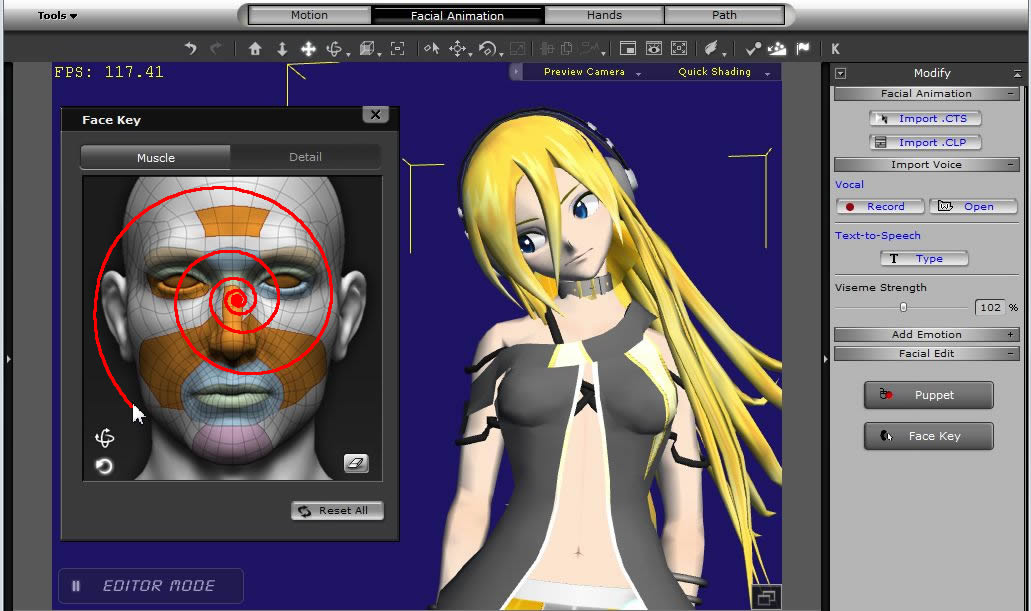
2.1 |
Facial Edit Confirmation |
| |
1) Go to Modify/Facial Edit and click 'Face Key' button. |
| |
|
| |
2) Click Head Orientation and/or Head Tilting icon on the 'Face Key' window and drag the mouth. Model head moves with Eyes. |
| |
|
| |
|
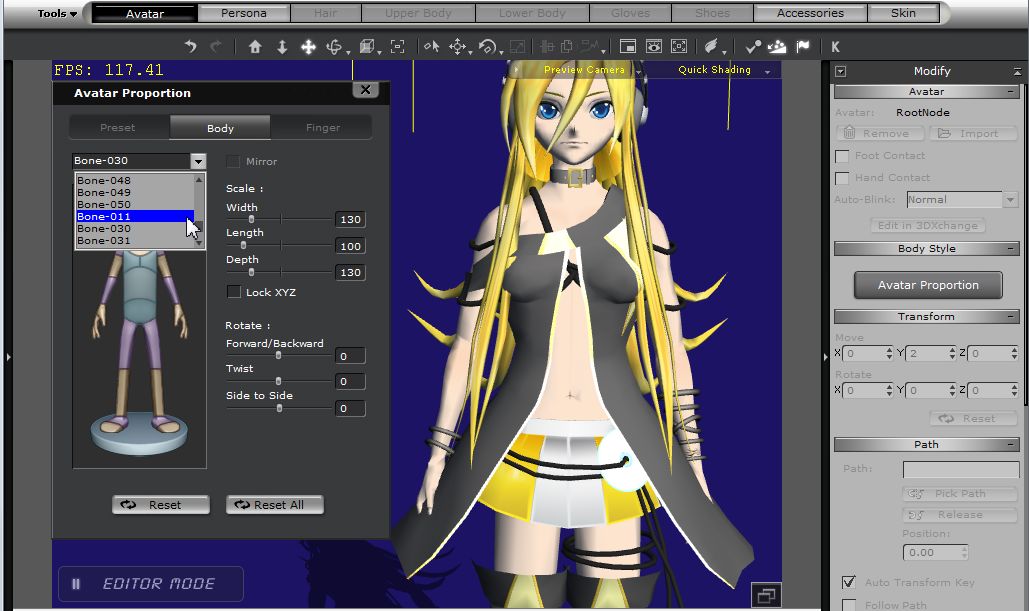
3.2 |
Avatar Proportion |
| |
Model Proportion |
| |
Model size (Width, Length, Depth) can be edited for the following bone elements.
Bone-000, 002(Shoulder), 005, 006, 012, 013(Left upper arm), 014, 015, 06, 017, 072, 018, 019, 020, 021, 022, 023, 024, 025, 026, 027, 028, 029 ,033, 034(Right upper arm), 035, 036, 037, 038, 078, 039, 040, 041, 042, 043, 044, 045, 046, 047, 048, 049, 050, 011(chest), 030(L-leg), 031, 051(R-leg), 052, 053, 059, Body |
| |
(Personal Preference are as follows)
Adjusted Shoulder at Bone-002: W/L/D=130/110/110,
Adjusted Left and Right Upper Arm:Bone-013/034=120
Adjusted Left and Right Leg Bone-030/051: W/L/D=130/100/120 |
| |
|
| |
|
3.3 |
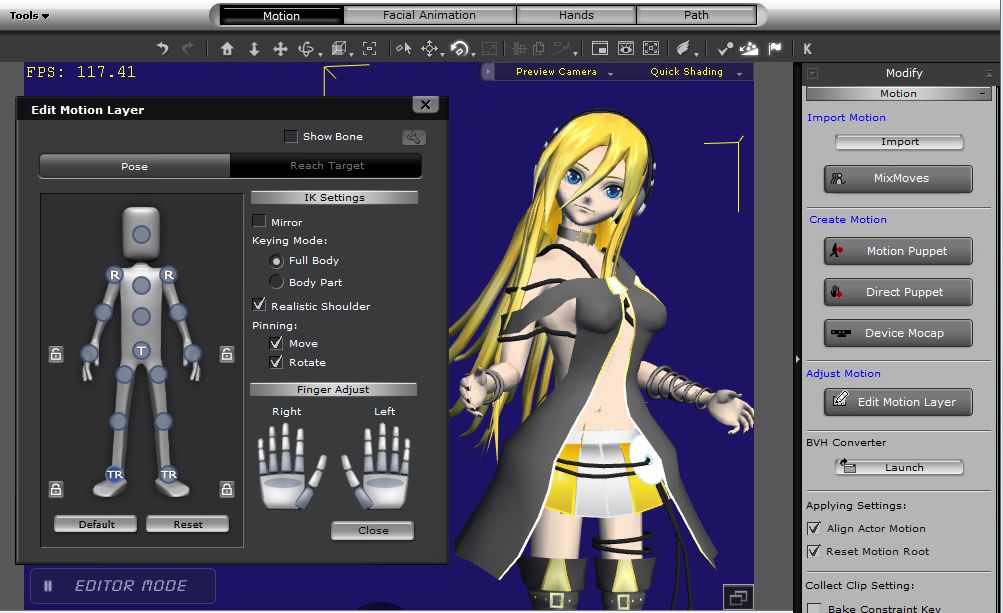
Edit Motion Layer |
| |
Model body parts are controlled in the Edit Motion Layer panel. |
| |
|
| |
|
3.4 |
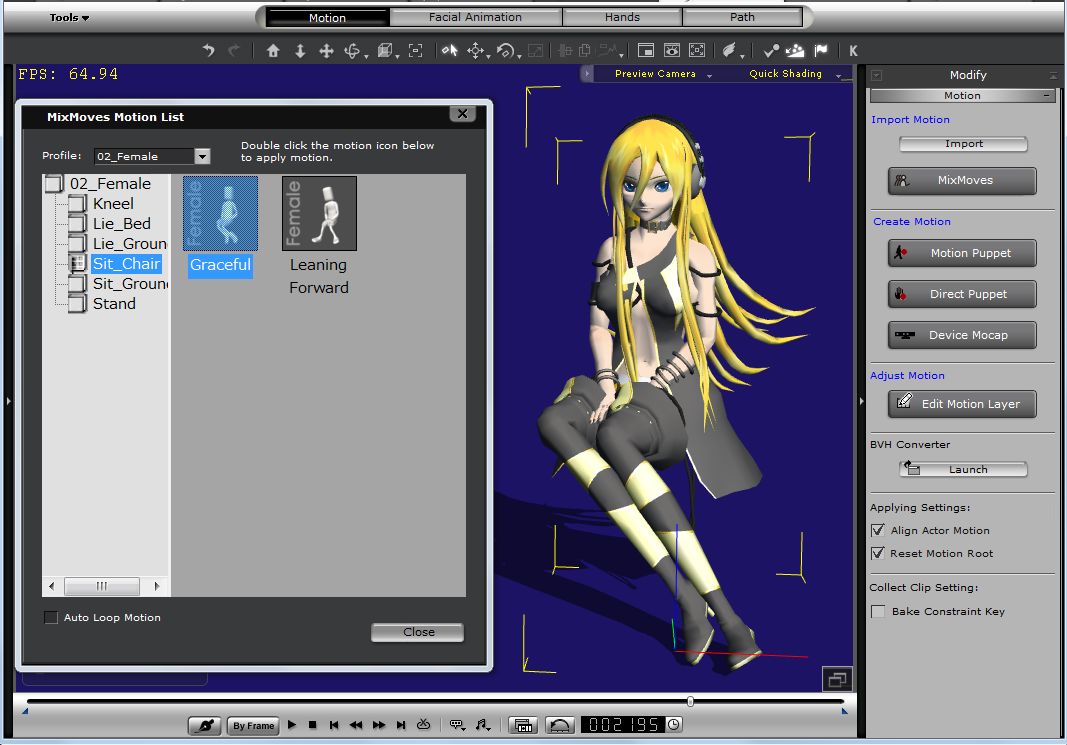
Mix Move |
| |
Preset motion can be applied.
Click 'MixMoves' Button, open MixMoves Motion List. |
| |
|
3.5 |
Show Bone |
| |
'Show Bone' and 'Bone Settings' menus are available. |
| |
Bone size, color and opacity can be changed freely. |
| |
|
| |
|
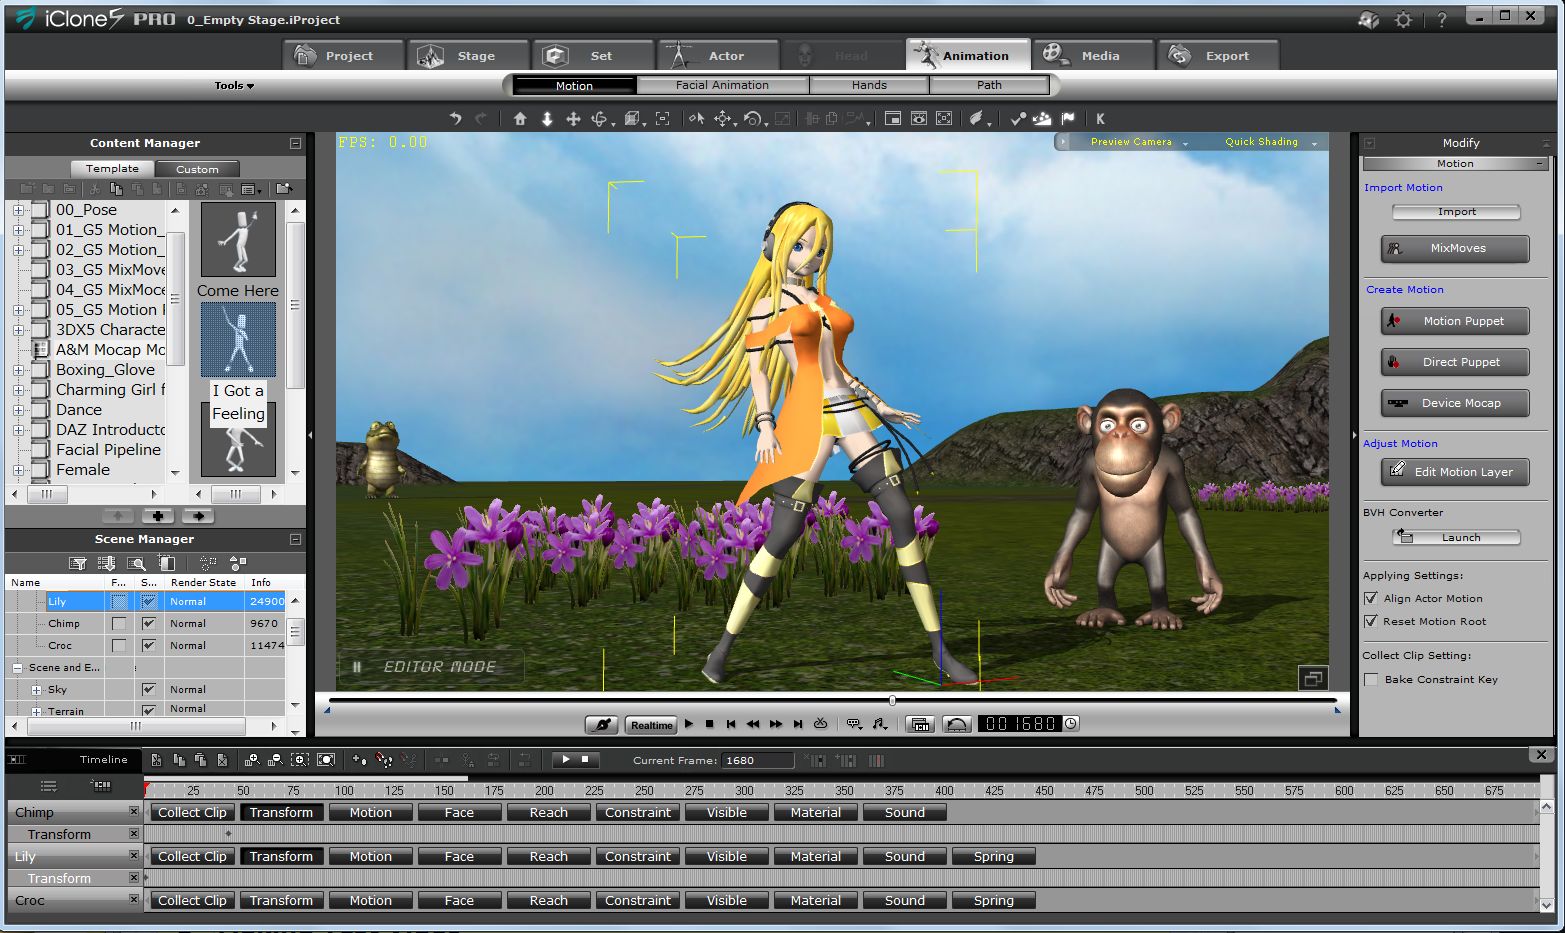
4 |
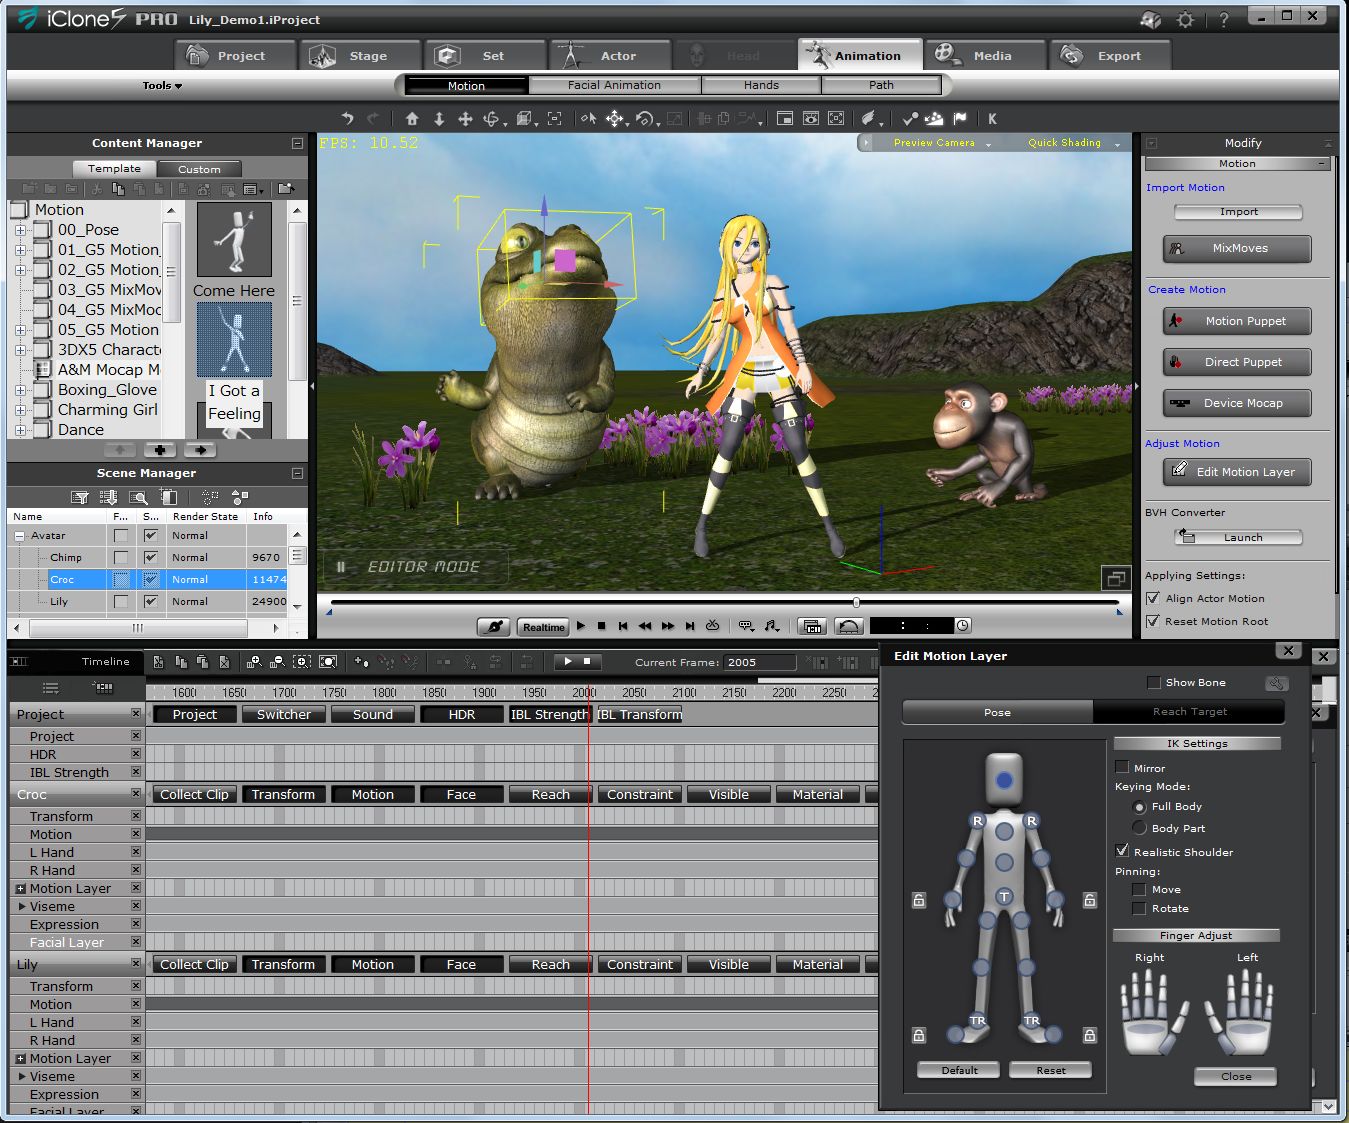
Making Test Video |
| |
1. Body Motion |
| |
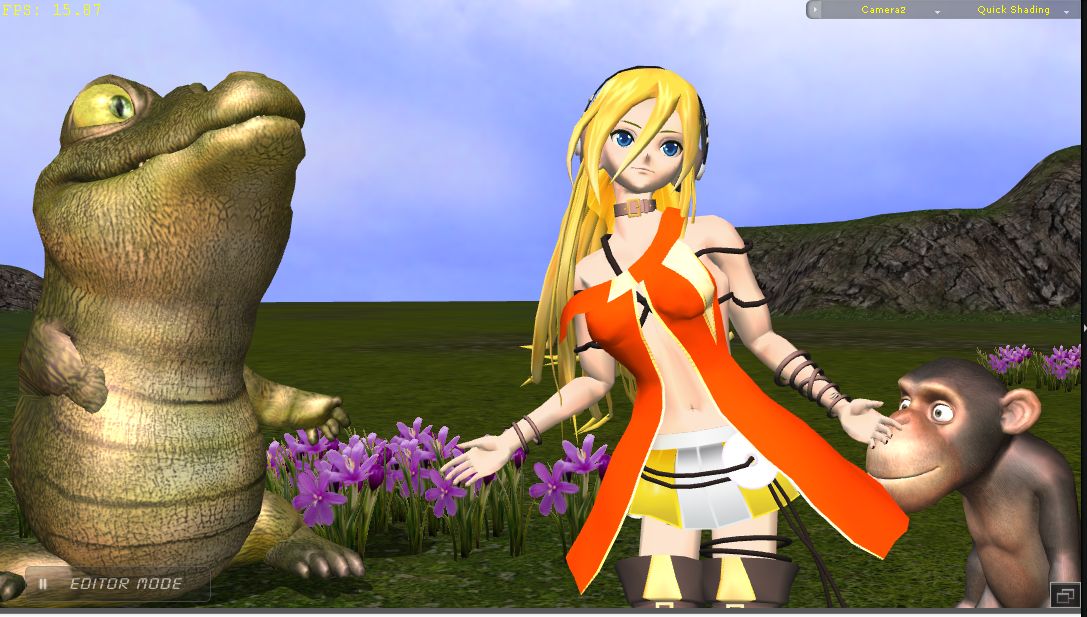
1) Prepare MMD model with new sample Friends. |
| |
2) Prepare sample background and locate models and Lights. |
| |
3) Set the animation frame length at the Time Setting Panel. |
| |
4) Locate a main animation motion to the model in the time frame. |
| |
Motion: I Got a Feeling in A&M Mocap Motion Series, Model: Chimp, Croc
 |
| |
5) Compose the video by using Motion track lists for each models. |
| |
|
| |
|
| |
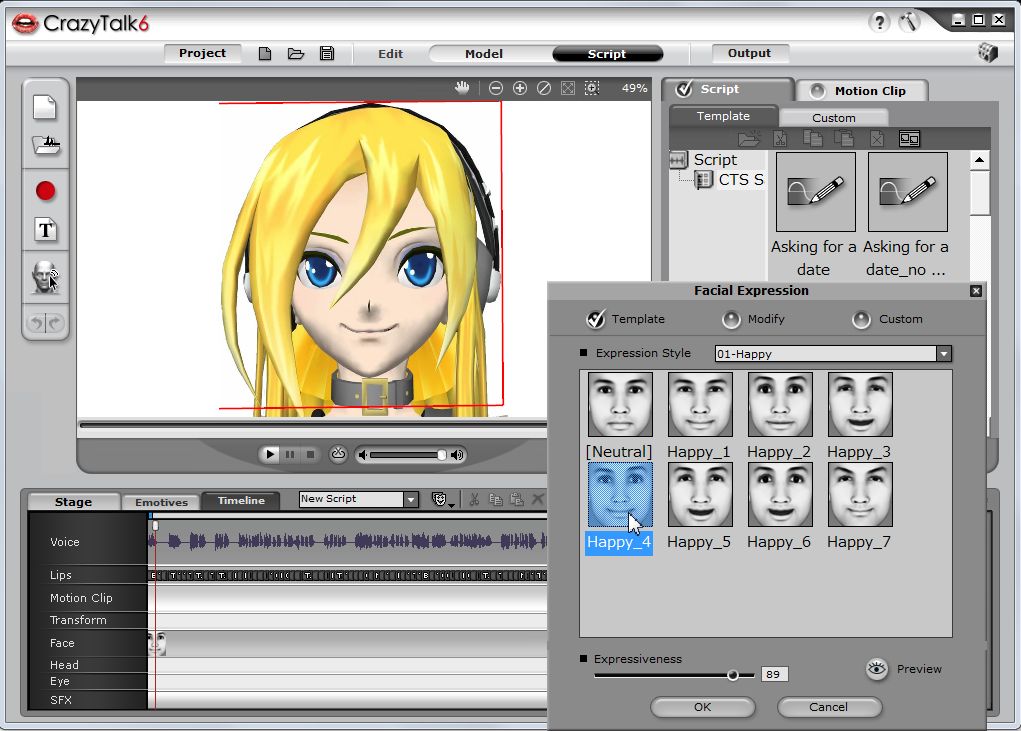
2. Facial Expression |
| |
Facial Expression data of DAZ models can be utilized in iClone 5.4, however, I'm not familier with how the facial morph data for MMD models can be exported.
Alternatively, Crazy Talk is used for the facial part in the video. |
| |
1) Open TTS Editor. VW Julie voice is applied. Voice Pitch 55%. |
| |
Preview and edit the text carefully before applying to the model.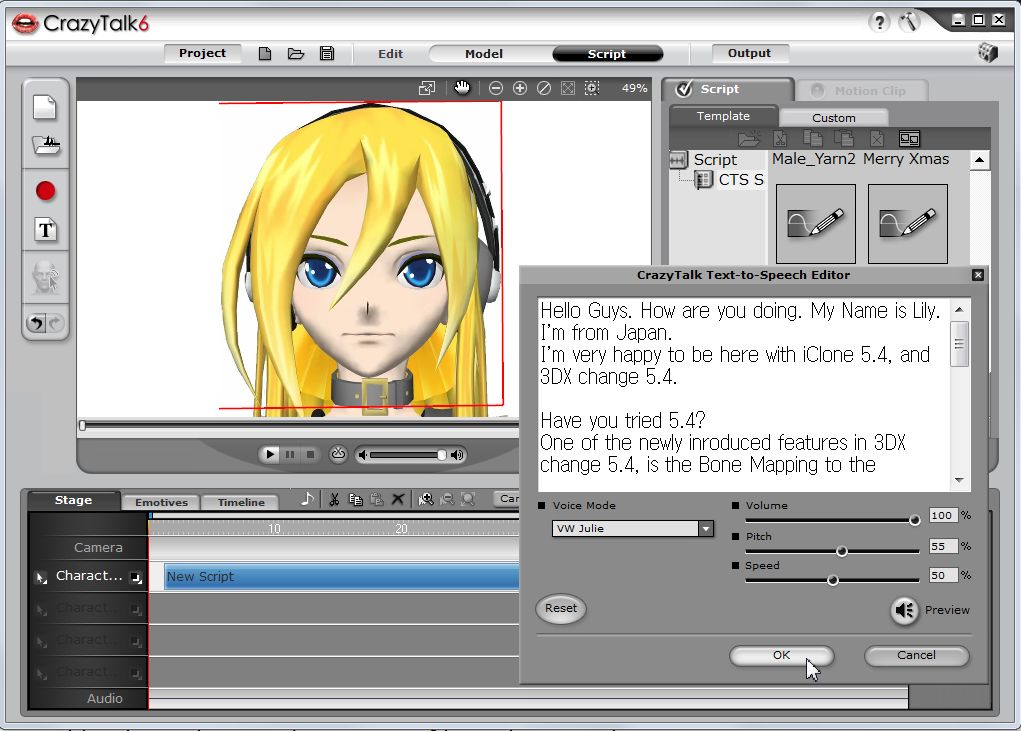 |
| |
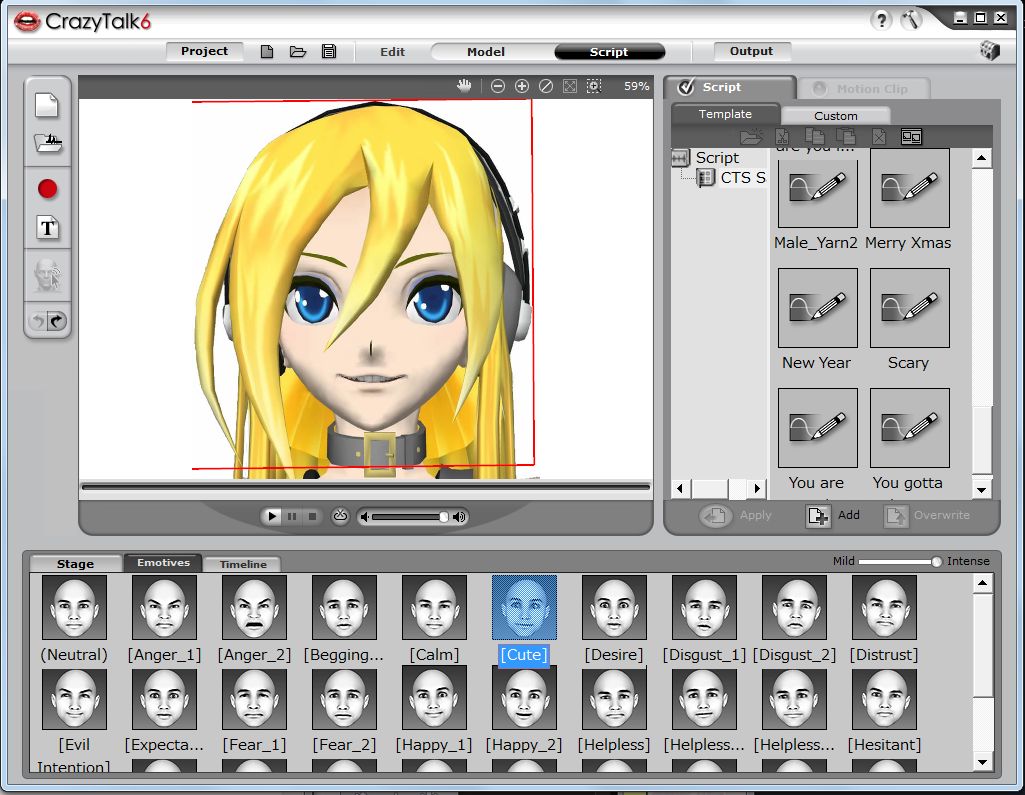
2) Add Facial Expressions by Template. |
| |
|
| |
3) Emotives are also available. |
| |
|
| |
3. Final Demo Video is shown at YouTube. |
| |
|
3DXchange5 Pipeline Test Series 11: MMD to iClone5.4
2013. 3.20 by Hirospot (Personal Site) |