3DXchange5 Pipeline Test Series 9: MMD Model to Unity - 1st Step
2012.9.15 (Revised 10.20) by Hirospot (Personal Site)
|
|
FBX Export from 3DX5 can help MMD Model and iMotion to Unity. |
|
|
|
|
|
|
 印は日本語でのレポートです 印は日本語でのレポートです |
|
|
For using the MMD Model, Sincere Thanks to the Designer and Company listed.
|
3DXchange5 Pipelineを使うとMMDキャラクターをiClone非標準キャラクター化してから、キャラクターの形状と内蔵モーションをFBX形式でUnityに渡し、ゲーム環境内で使用できるようになります。
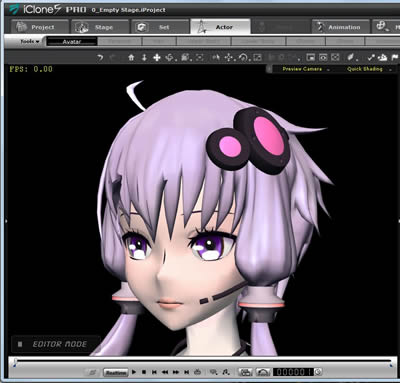
今回のテストではMMDモデルとして「結月ゆかり」を新たに使わせて頂き、Unity(フリー版)内でマテリアルを修正したり、カスタムモーションを再生するための方法について試行してみました。
|
|
|
|
MMD Models have been defined in 3DXchange as iClone Non-Standard Model and so they can be used in Unity Environment.
This Test is made for MMD 3D Models with Custom motions to be exported to Unity by using 3DXchange5 Pipeline by FBX format.
According to Reallusion video articles, not only Standard iClone Models, but Non-Standard Models can be imported to Unity with motions as Avatars and no further modifications are required for applying the imported motion in Unity.
Not only Custom motions applied to iClone Standard Model by Persona in iClone are imported to Unity, but other Custom iMotions listed in Motion Libraly of 3DXchange5 for Non-Standard Models can also be imported.
This is a very basic study for MMD Models using in Unity.
Interactive control in Unity will be tested in the future report.
This is also my personal interest and no business issues are involved.
The test step is as follows:
| |
1. |
Prepare MMD Non-Standard Model with iMotions. |
| |
2. |
Export Geometry only by Export FBX advanced settings preset for Unity. |
| |
3. |
Export Each iMotions without Geometry in the same way. |
| |
4. |
Prepare a Stage for the use in Unity. |
| |
5. |
Set up Unity environment and get to know the Unity interface.
Utilize the Project, Hierarchy, Inspector & Animation view panel.
|
| |
6. |
Basic MMD Model set-up operation in Unity. |
| |
7. |
Applying imported Animation to the MMD model. |
| |
8. |
Learn how to change imported motions. |
| |
9. |
Playing imported motions on two Models. |
| |
10. |
More test for MMD Model and Custom Motion play. |
|
|
|
Listing of the tools and files
|
Version & Spec |
Description |
| MMD Model |
YUZUKI_YUKARI.pmd |
Special Appendix Model in Windows100% magazine |
| MMD Model |
YUZURIHARA INORI |
| Live Animation |
Beta 4.30DreamFactory
|
Exporting of MMD Motion
BECKY_PANKING.lam converted to .BVH (Report 5) |
| PMD Editor |
ver 0.1.3.8 - 0.1.3.9
|
Detail:Report #4, Import .pmd Model |
| Plugin |
ColladaExportPlugin.dll |
Detail:Report #4, DAE Exporting |
| FBX Converter |
2013, Autodesk |
Convert .dae to .fbx |
| MMD Stage |
Stage01.x
|
Comes with MMD Accessory |
| 3DXchange5 Pro Pipeline |
5.1.0829.1 |
Export Mesh and iMotion with FBX format separately. |
| iClone5 Pro |
5.3.2103.1 |
Manipulation of Model and Motion |
| Sample Model |
Gwynn (Test Reference) |
iClone G5 Standard Character |
| Unity 3 (Free) |
3.5.5f3 - 3.5.6f4
|
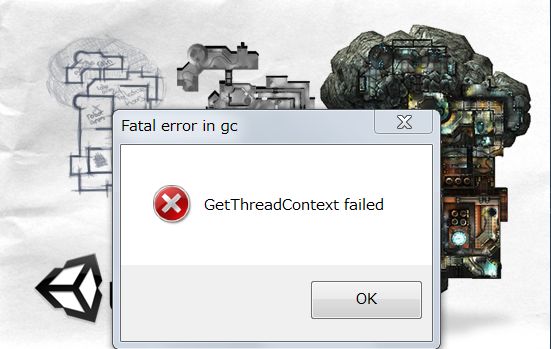
Unity Start up Caution (Win7 64Bit):
Issue with ESET Smart Security 4.2.71.2 |
|
|
|
1 |
Preparation of target MMD Model |
1.1 |
Select MMD Model to be used in the test. (Please Refer to my Report #4 and later). |
1.2 |
Use .dae to FBX Converter to get FBX file for 3DXchange5 Pipeline. |
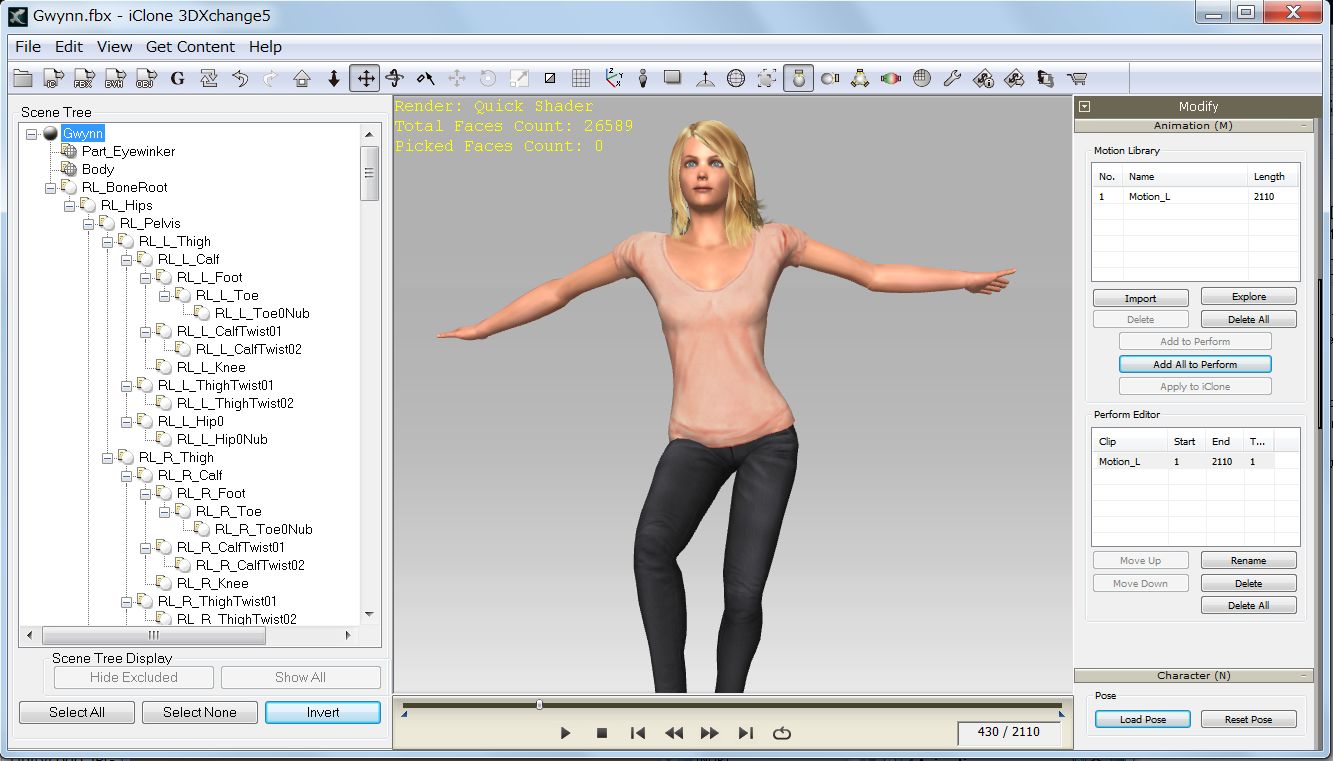
1.3 |
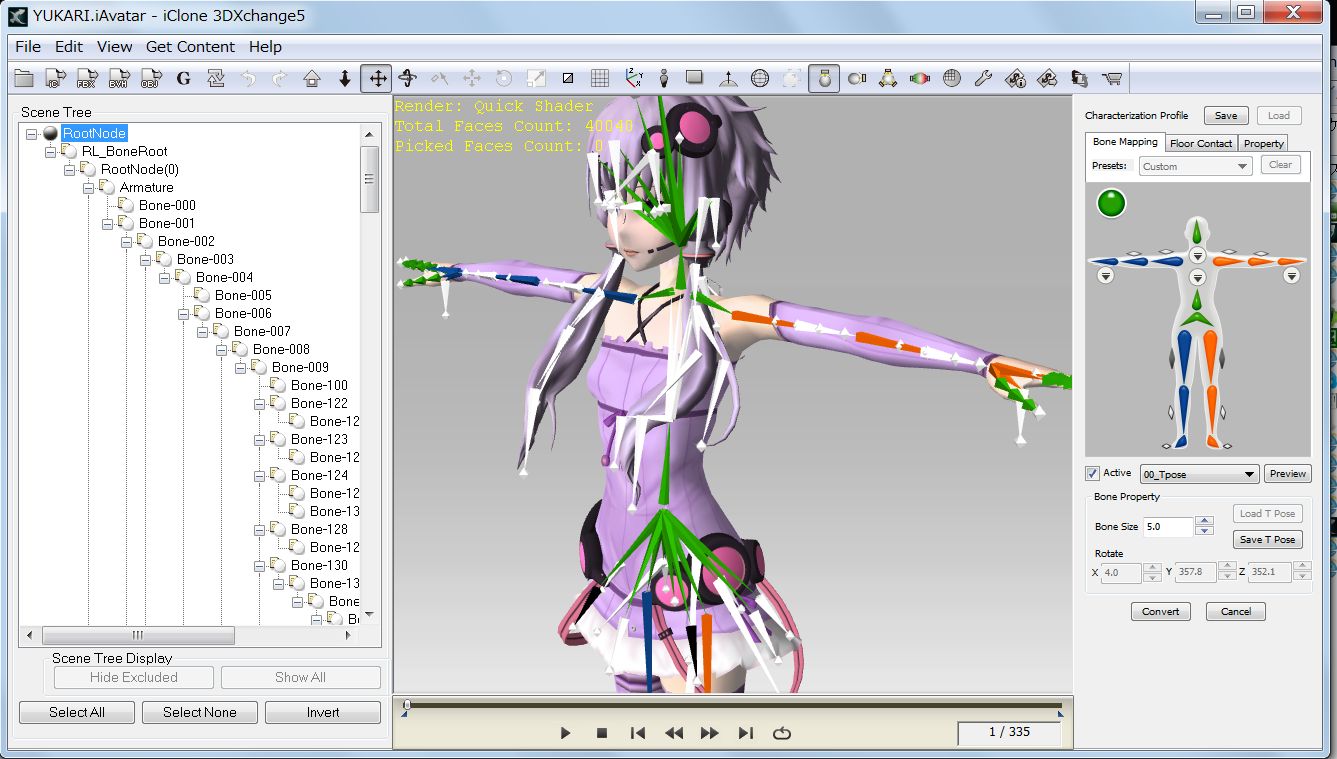
Use manual Bone Mapping for MMD Model to operate as Non-Standard iClone Model. |
|
Click first on each iClone basic bones and click on the corresponding MMD bones until Red indicator turns to Green.
|
1.4 |
Import some iMotions available in iClone5 such as Wave, Walk and Idle into Motion Library. |
1.5 |
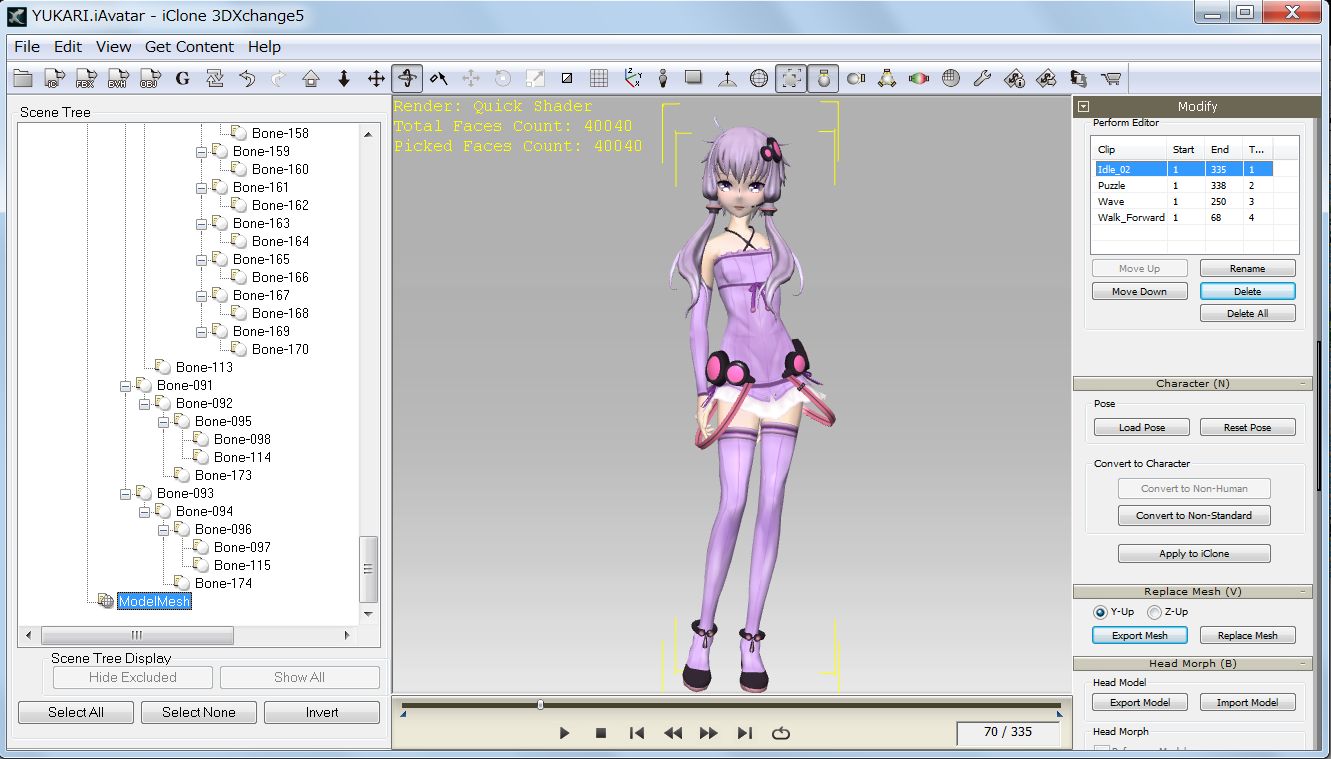
Apply them to the MMD Model by pushing "Add to Perform" button. |
1.6
|
Preview each iMotions in the viewer.
 |
2 |
Exporting the Mesh of the MMD Model |
2.1 |
Make folder with the name "To Unity". (Can be any name.) |
2.2 |
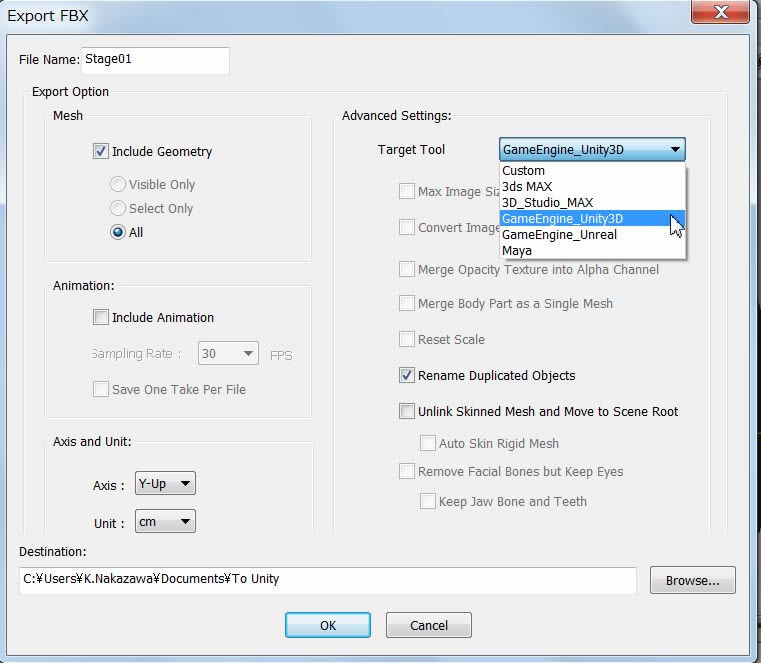
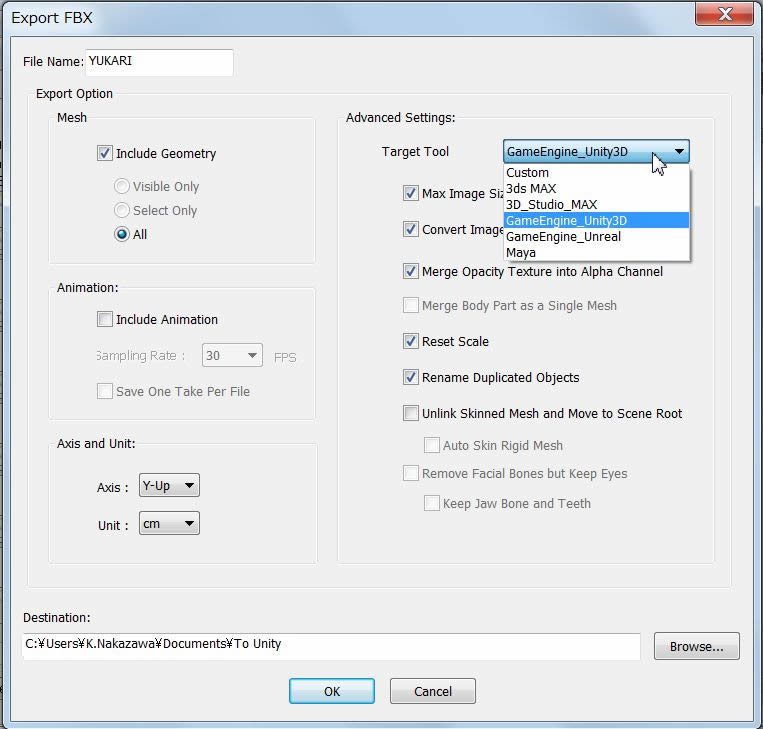
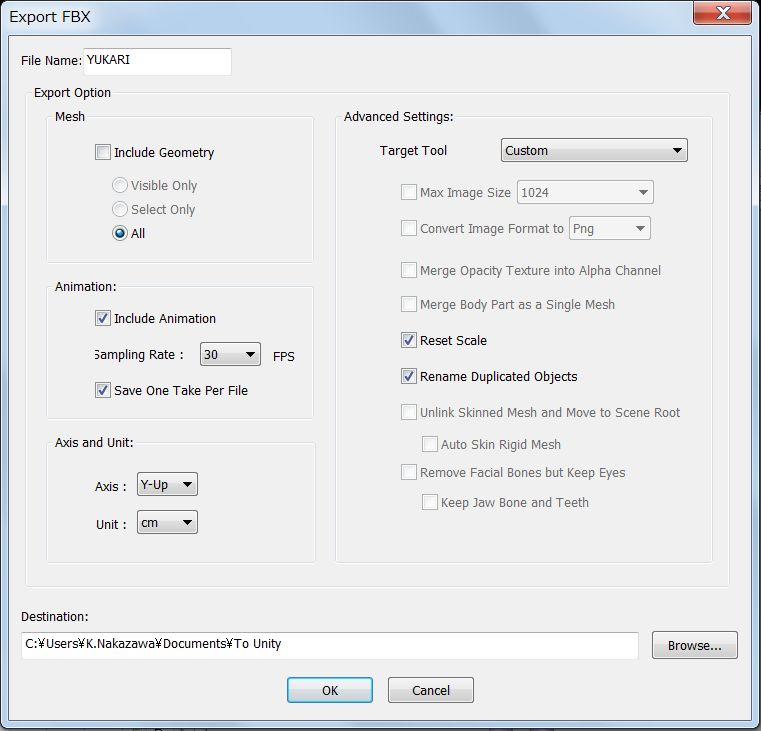
Firstly, export only Mesh of the MMD Model. |
|
Export FBX/Export Option/Mesh/→Include Geometry
At 3DX5 Pipeline: Advanced Settings/Target Tool/(drop-down)→GameEngine Unity3D
 |
3 |
Exporting of iMotions |
| |
Select "Including Animation" and "Save One Take Per File").
Deselect "Include Geometry" under Mesh. (Target Tool turns to Custom)
 |
4 |
Preparation of Stage for Unity. Try the MMD stage for example. (Optional) |
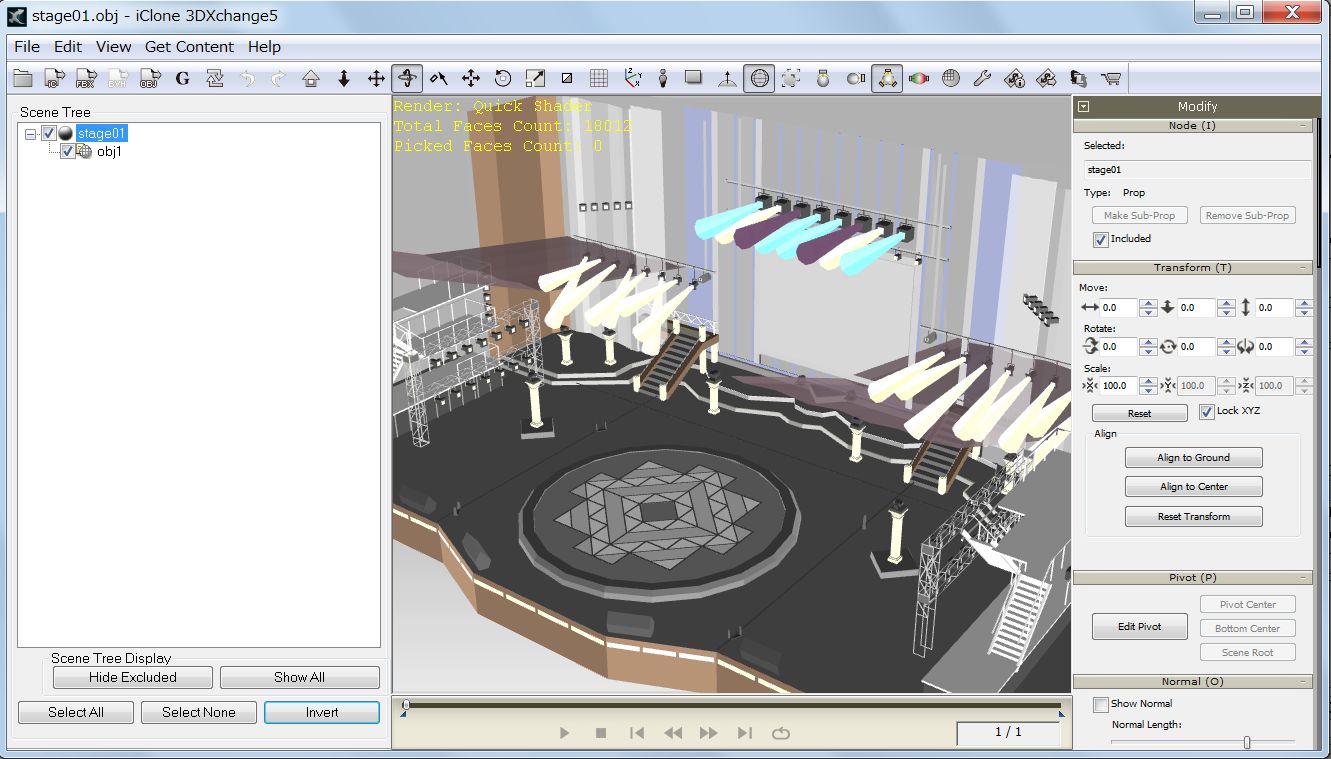
4.1 |
Open MMD/UserFile/Accessory/stage01.x
Use PMD Editor to get stage01.obj and import to 3DXchange5.
|
4.2 |
Export the Stage through the Export FBX/Advanced Settings/Target Tool/Unity 3D. |
| |
|
4.3 |
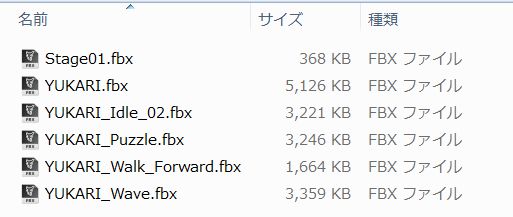
Confirm all the exported FBX files (Model, Motions and Stage) in the "To Unity" folder. |
| |
|
5 |
Set up Unity3D Environment. |
5.1 |
Download the Unity3D(UnitySetup-3.3.5.exe), install and Start. |
a |
When "ESET Smart Security" is used, Unity never start up. (Win7, 64Bit)
|
| |
|
Searched the issue and found the
Web site TM Life .
Thank you very much for the precious info. |
|
b |
Make the following Pass setting and try start up several times for success. |
| |
C:\Program Files(Game) ¥Unity¥*.*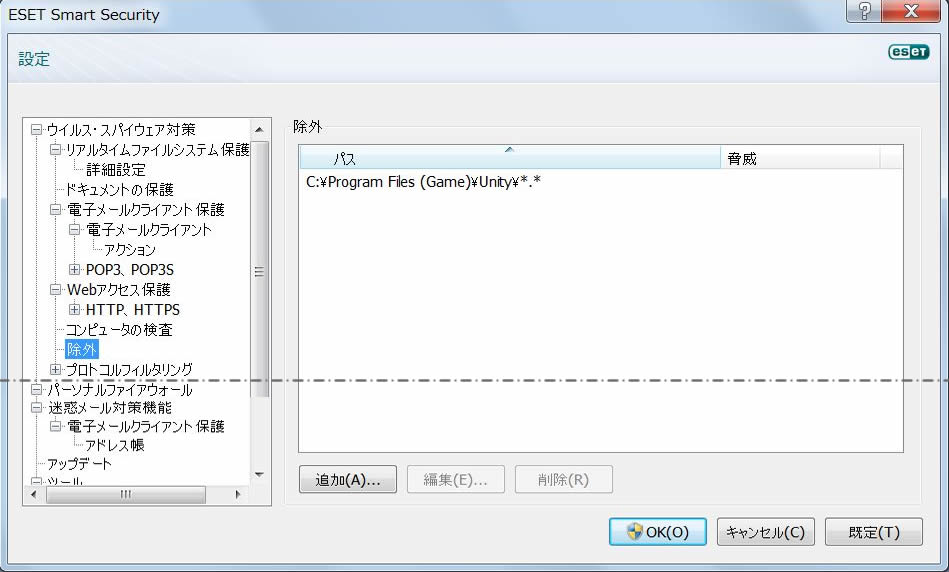 |
5.2 |
When Opened, blank Scene is shown. View panel layout is selectable and movable. |
| |
Project, Hierarchy and Inspector View can be placed separately by dragging each ViewTab.
 |
5.3 |
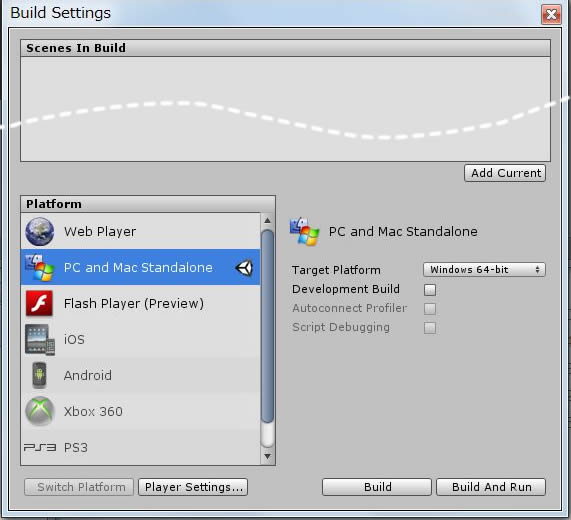
Go to File/Build Settings and select Platform and Target Platform from Win/Win64/Mac. |
| |
|
5.4 |
Go to GameObject/Create Other/, then, add Camera and Directional Light in the Scene. |
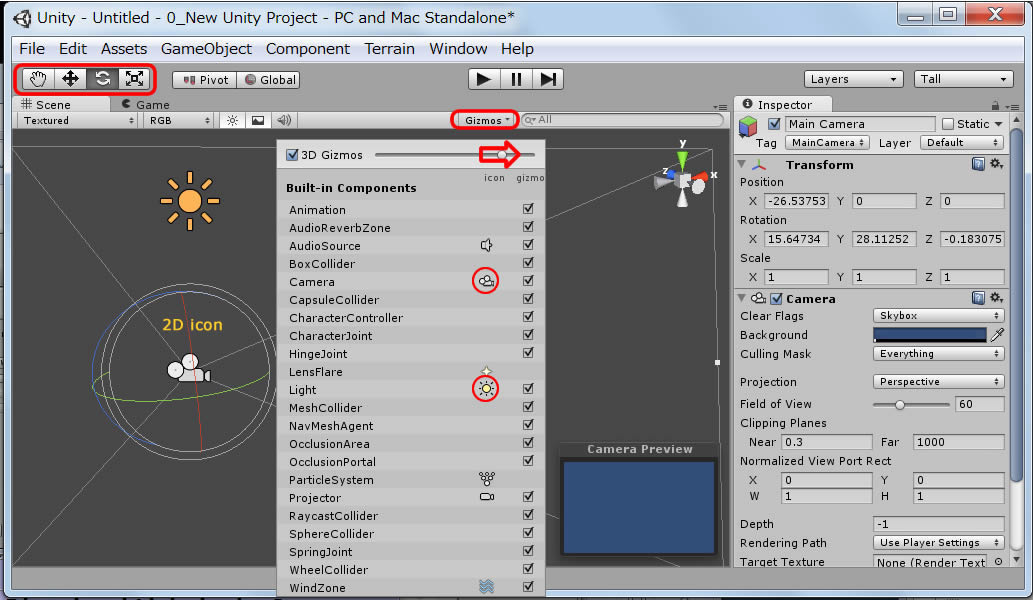
5.5 |
Open Gizmos panel to adjust the size and visibility of Camera and Light icons. |
5.6 |
Use Transform Tools to move, rotate and scale all objects in the Scene. |
5.7 |
3D Gismos provides Slider to adjust the icon size of the Camera and Light in the Scene.
For example, when Camera is selected, its setting values are informed in the Inspector View.
Click on icon images to show/hide them in the Gizmo panel.
 |
5.8 |
Mouse can also be used for transforming.
Push center button to move, Right button for rotate and rotate center button to scale. |
| |
|
6 |
MMD Model Set-up Operation in Unity (Introductive Part) |
6.1 |
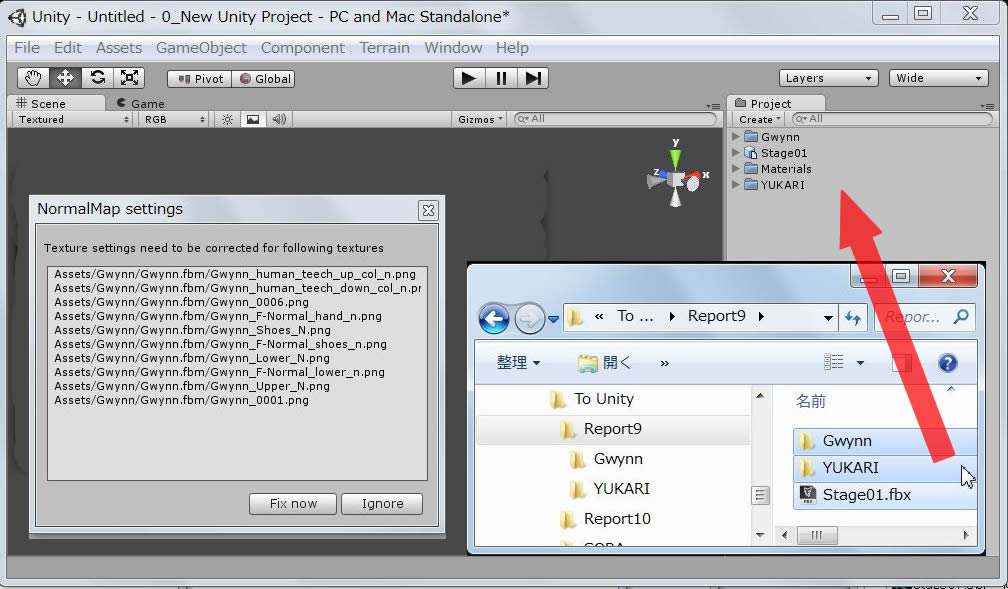
Drag all the FBX data of MMD model, iMotions and Stage into Project panel. |
| |
|
6.2 |
Open the YUKARI folder, drag YUKARI file into the Screen, adjust Position and Scale. |
| |
When you push YUKARI, 3D image is also shown in the Purview window.
When you drag YUKARI into Scene, set X,Y,Z Position to zero and scale her by approx. 10-30x enlarged.
For Normal Map settings, click "Fix now" button.
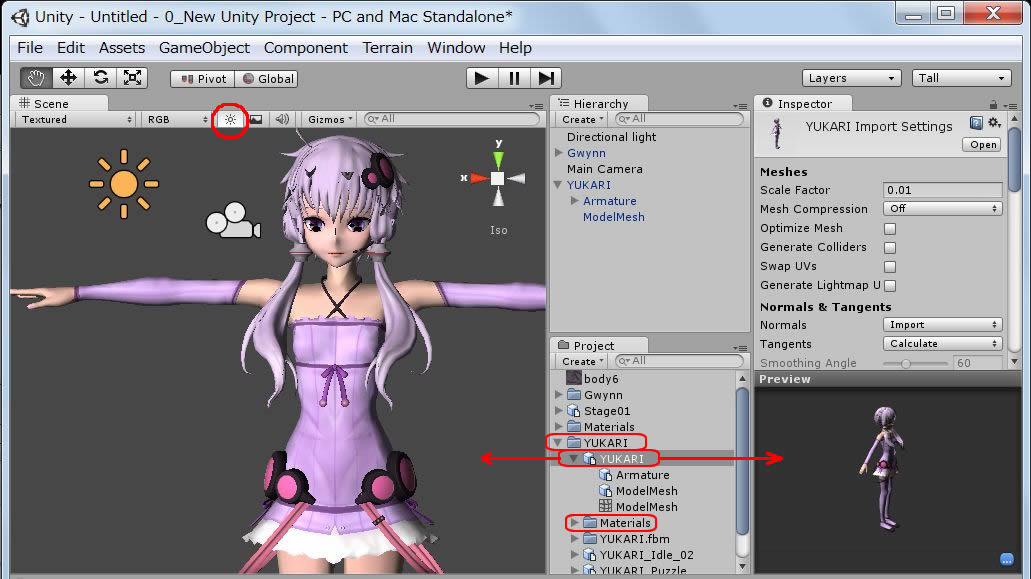 |
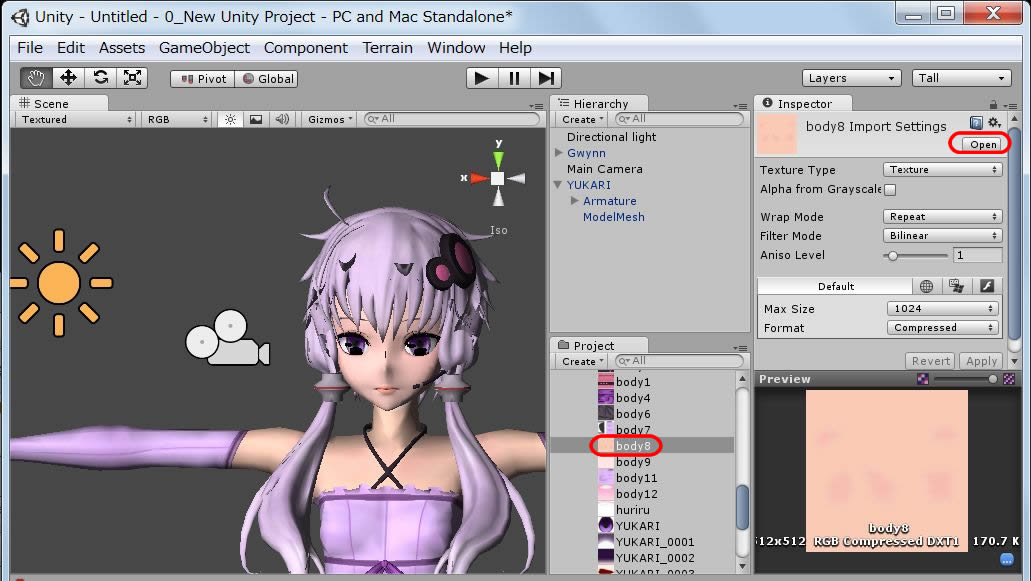
6.3 |
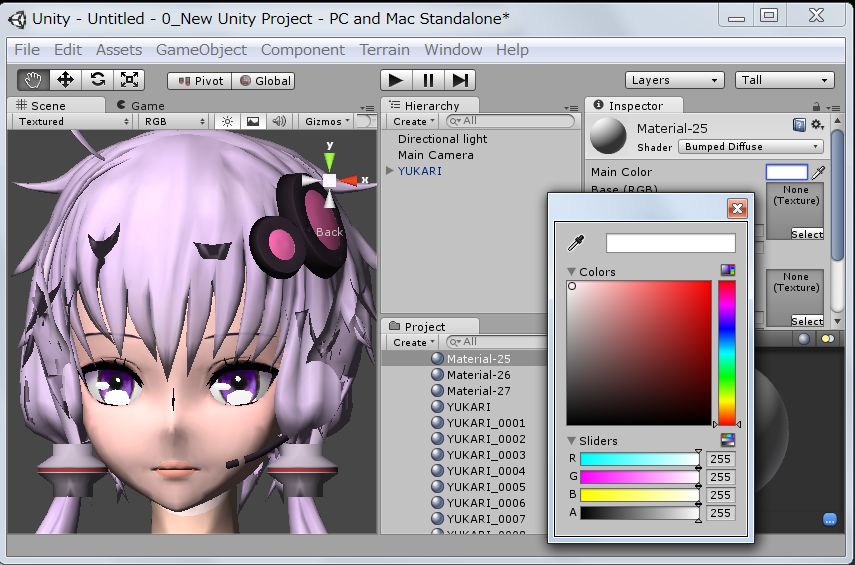
When texture color adjustment is needed, open Materials and select the color in the .fbm. |
| |
Select the color in the Project view, Open external tool, correct the color and save.
 |
6.4 |
Correct light in the Pupil of the Eye: Pick Material-25 and change Main Color. |
|
|
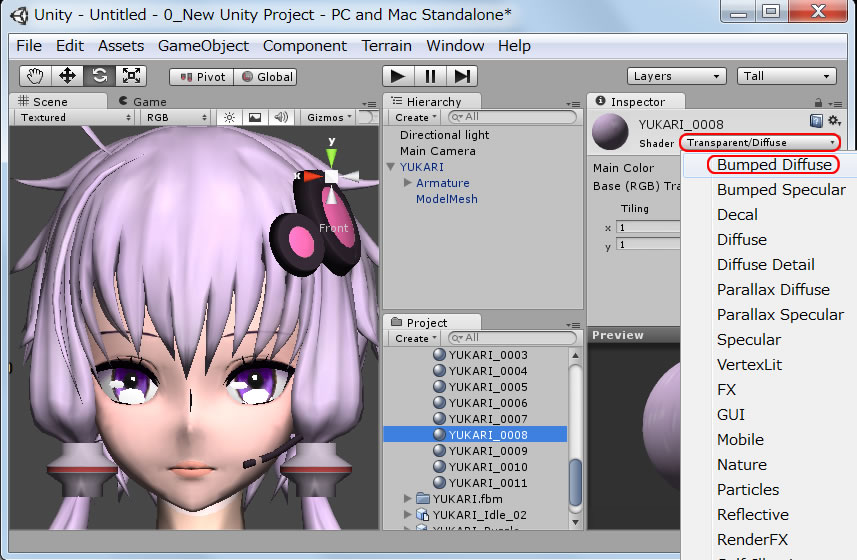
6.5 |
Use Inspector view for changing Shader type for the Model Hair. |
| |
Select Model Hair: YUKARI_0005 to 0011 to be changed and open the drop-down list.
Change Transparent/Diffuse to Bumped Diffuse.
 |
| |
|
7 |
Applying Animation to the MMD Model |
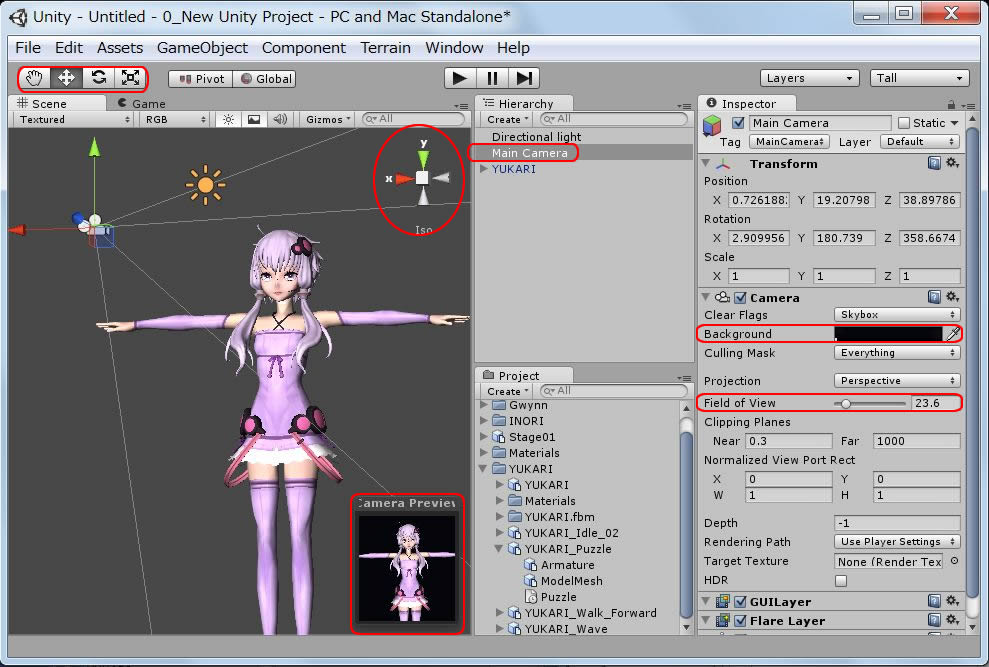
7.1 |
Click the Main Camera to create Preview for motion. |
| |
Preview Background Color can be changed in the default mode in which Model is T-posed.
 |
7.2 |
Click the Model YUKARI in Hierarchy view panel, open YUKARI in Project view panel and drag a motion clip into Animation indicator slot of the Inspector view panel. |
| |
Animation Clip Name turns to the motion clip name in MMD Model.
|
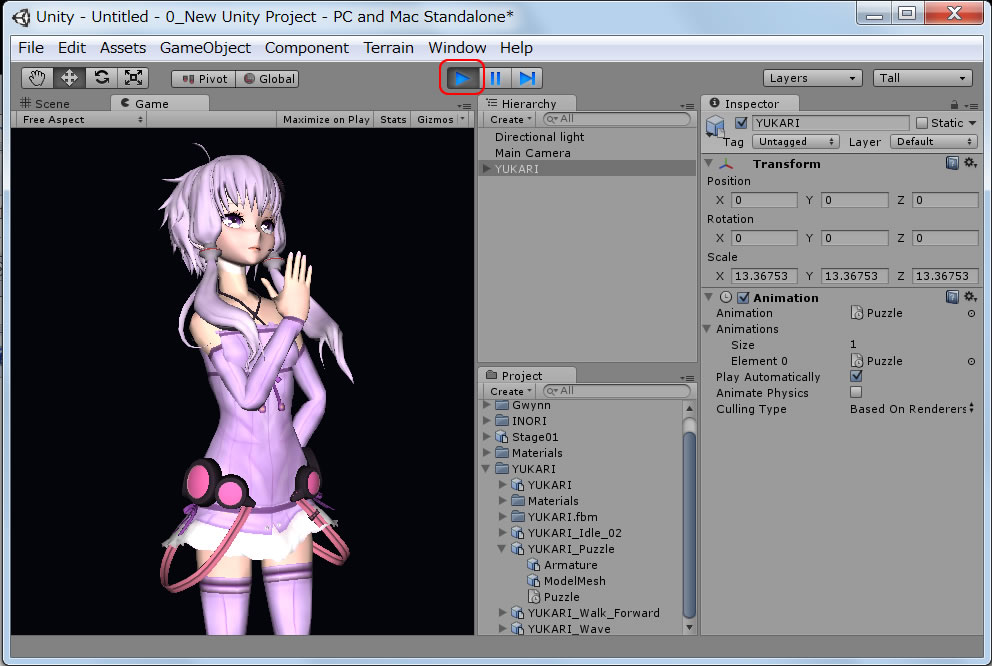
7.3 |
Press the Play button, then assigned animation starts in the Game screen automatically. |
| |
|
8 |
How to change motions |
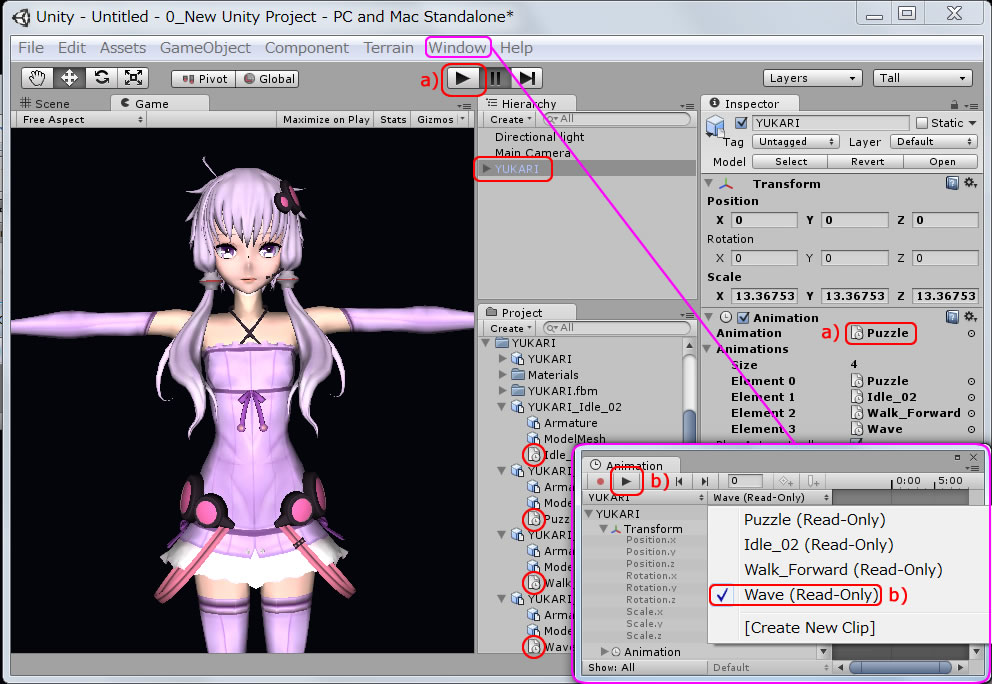
8.1 |
Select YUKARI, drag all the Motion Clip into Animation area in Inspector view panel. |
8.2 |
Open Animation View panel from Window. Now, Two Play buttons are available.
Any change must be done in reset mode in which Model shows T-pose. |
| |
a)Use Play button for Game screen to play back the motion clip in the Animation panel.
The Motion can be changed by dragging the another Motion clip from the Project view panel to Animation slot.
b) Use Play button in Animation panel to play back the Motion Clip in the Animation List.
Motion can be looped within the range.
|
| |
| iClone Standard Character (Gwynn) and Persona motions has been added to the Project panel for the reference of Test operation. |
|
9 |
Locating Models on the Stage |
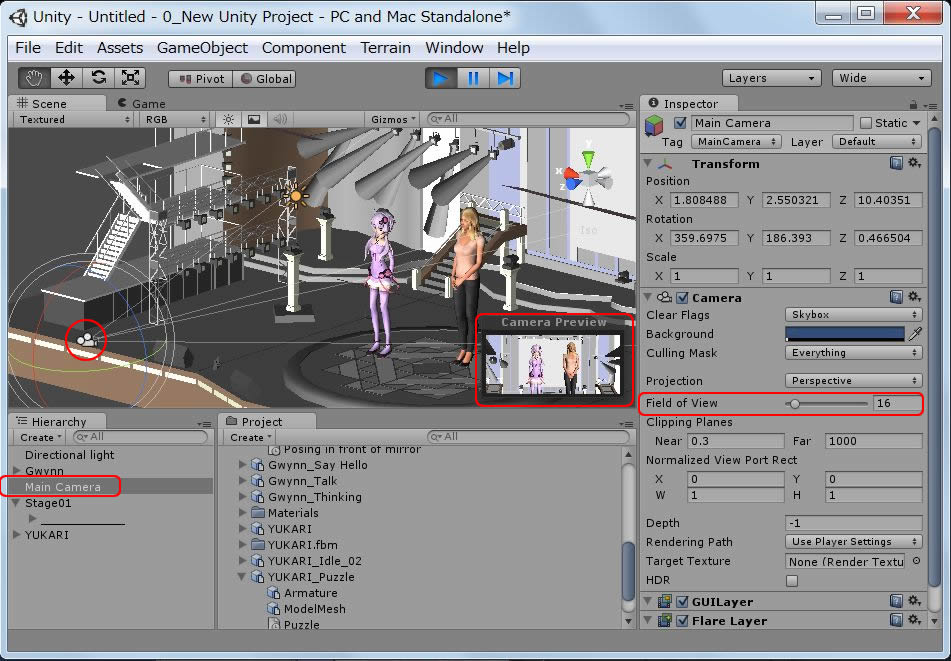
9.1 |
Drag the Stage into the Scene and locate Models, Light and Camera. |
| |
Select Main Camera in Hierarchy view panel, adjust camera distance and Field of View to get the best shot in the Preview.
|
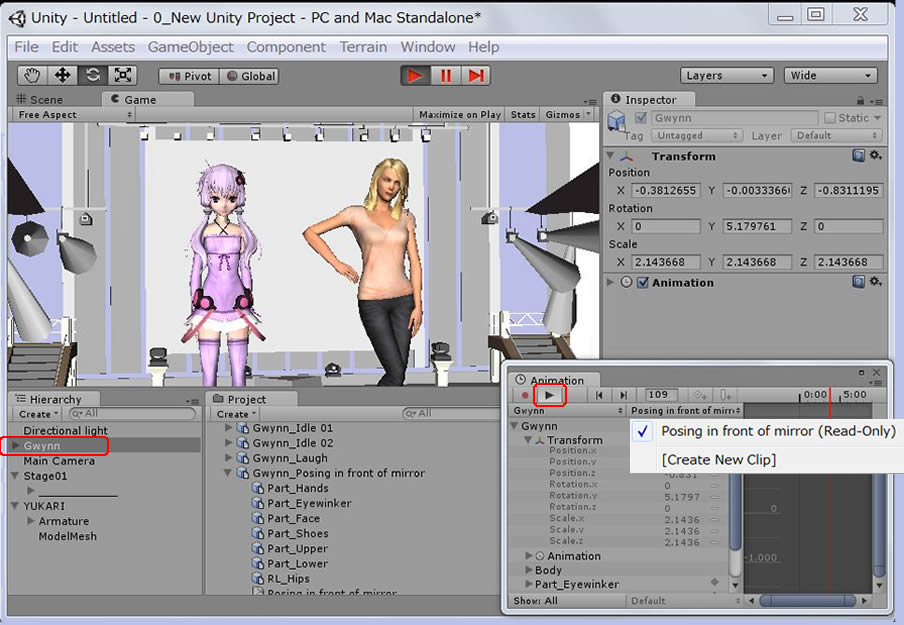
9.2 |
Select Gwynn in Hierarchy view panel, Select her Animation and Play. |
| |
|
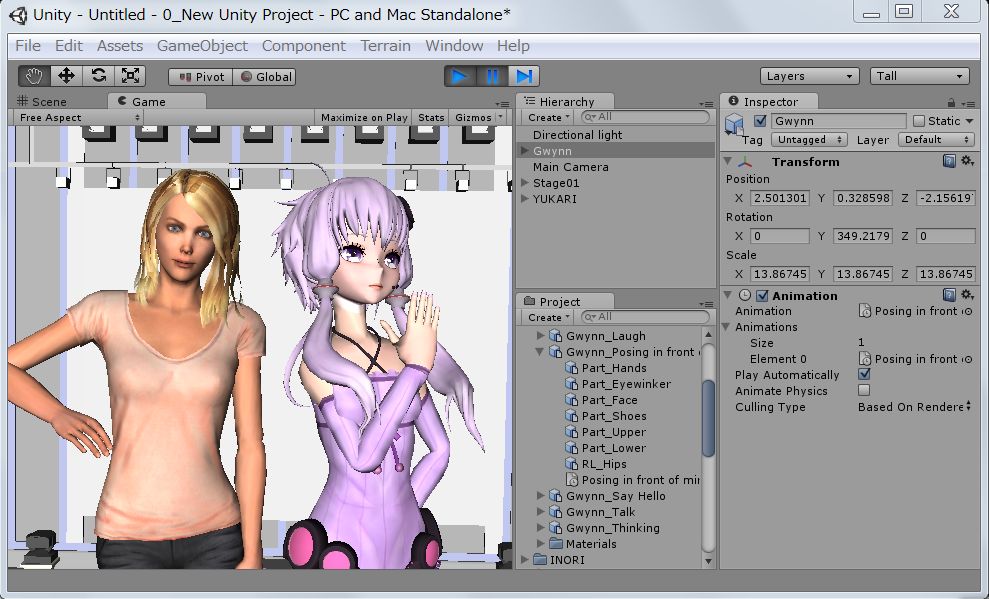
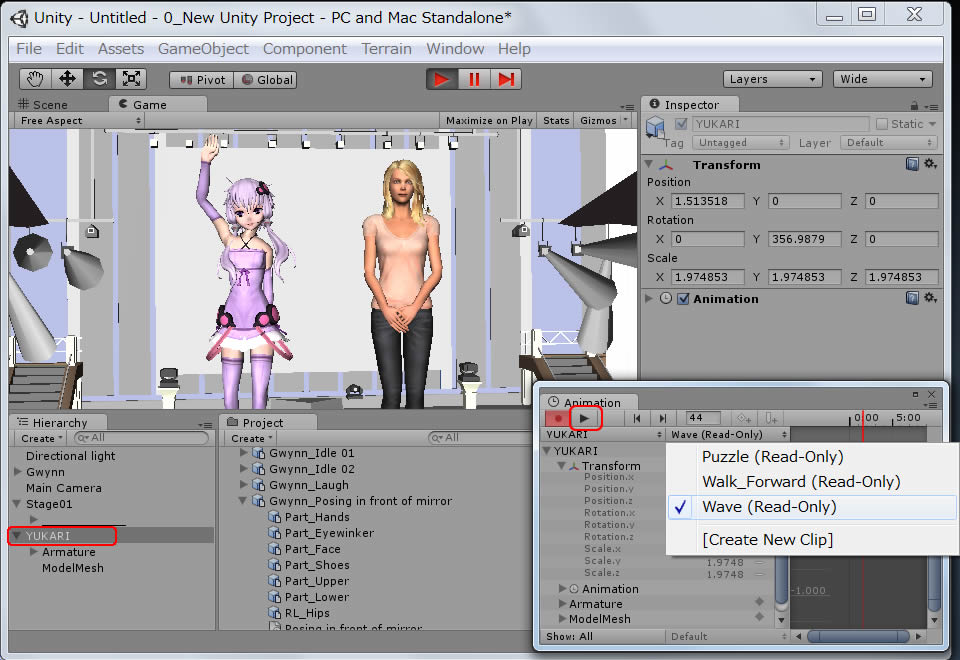
9.3 |
Select YUKARI in Hierarchy view panel, Select her Animation and Play. |
| |
In Animation view panel, select the motion by name in drop-down list.
 |
9.4 |
Two models can be moved at the same time. |
| |
Drag motions for both Models into Animation Clip indicator at reset mode. (Model T-Posed)
Use the Play button. The play is one time only.
 |
| |
|
9.5 |
Stop Button Operation:
a) Click Stop button in the Game mode, Motion just stops at the Play button is pushed.
b) Click Stop button in the Scene mode, Game screen returns to Scene view. |
| |
When in the Game mode, no access to the Game screen is possible.
There seems no Timebar available in the Game mode except step button to make forwarding a frame. |
|
10 |
More test for adding MMD Model and Custom Motion through 3DXchange5 Pipeline |
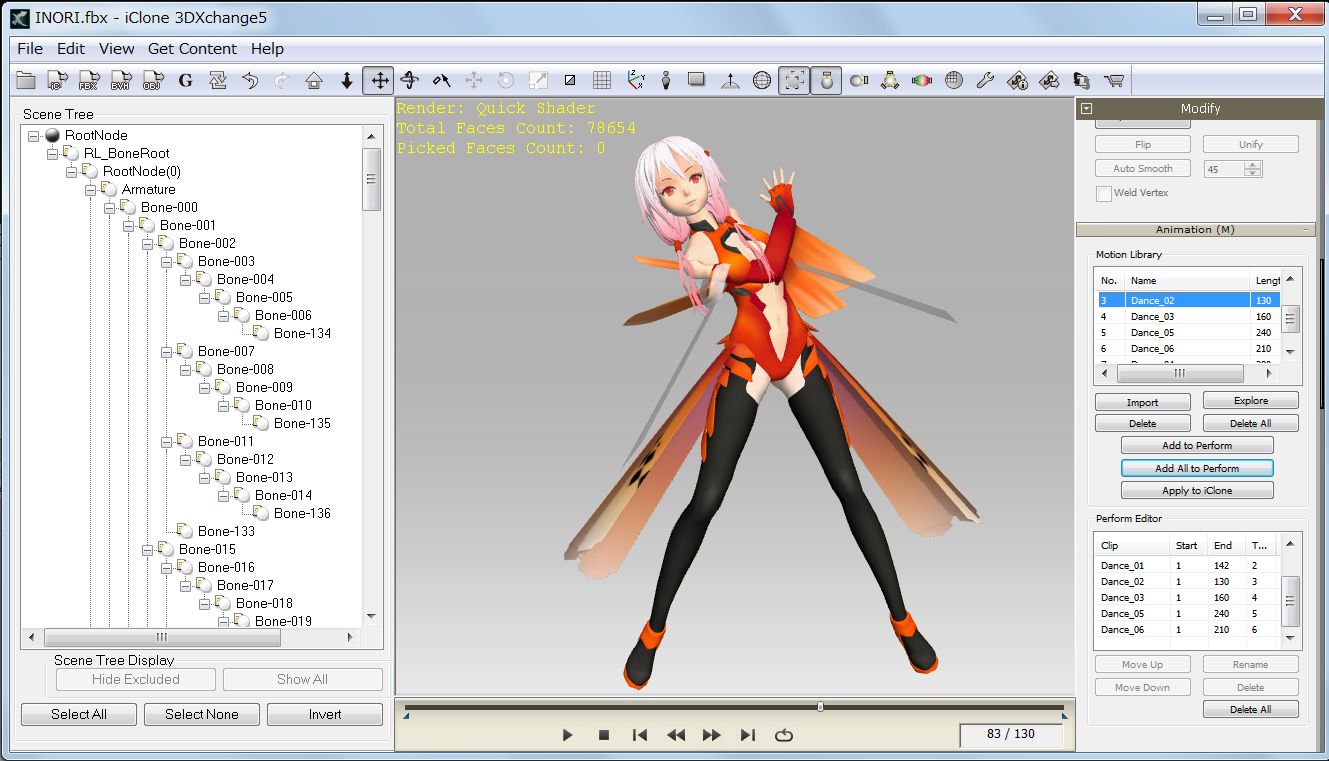
10.1 |
Bring MMD Model INORI used in the Report 8 and motion from LiveAnimation. |
| |
Use .dae to FBX Converter to get FBX file to 3DXchange5. Characterize her by manual bone mapping.
 |
10.2 |
Import other iMotions into Motion Library, click Add to Perform button. |
| |
iMotions can be imported into Motion Library and previewed, however, Export License will be confirmed.
 |
10.3 |
Following FBX files are prepared for more testing.
|
| |
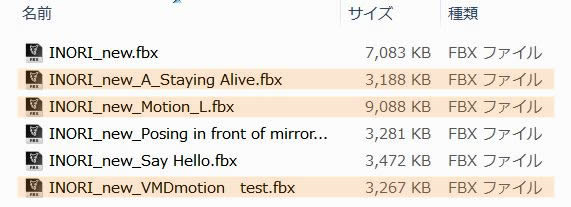 |
Many Motions available in my iClone resources have Export License.
These Motions listed here are confirmed one by one at the File/Export stage and found that they are License Free..
Custom Motions:
Motion_L is a sample in LiveAnimation: BECKY_PANKING.lam my Report 5 |
|
10.4 |
Open Unity, confirm the look of the added Model, Open Material in the Project view. |
| |
Shader type for Material-19 need to be Transparent/Diffuse.
 |
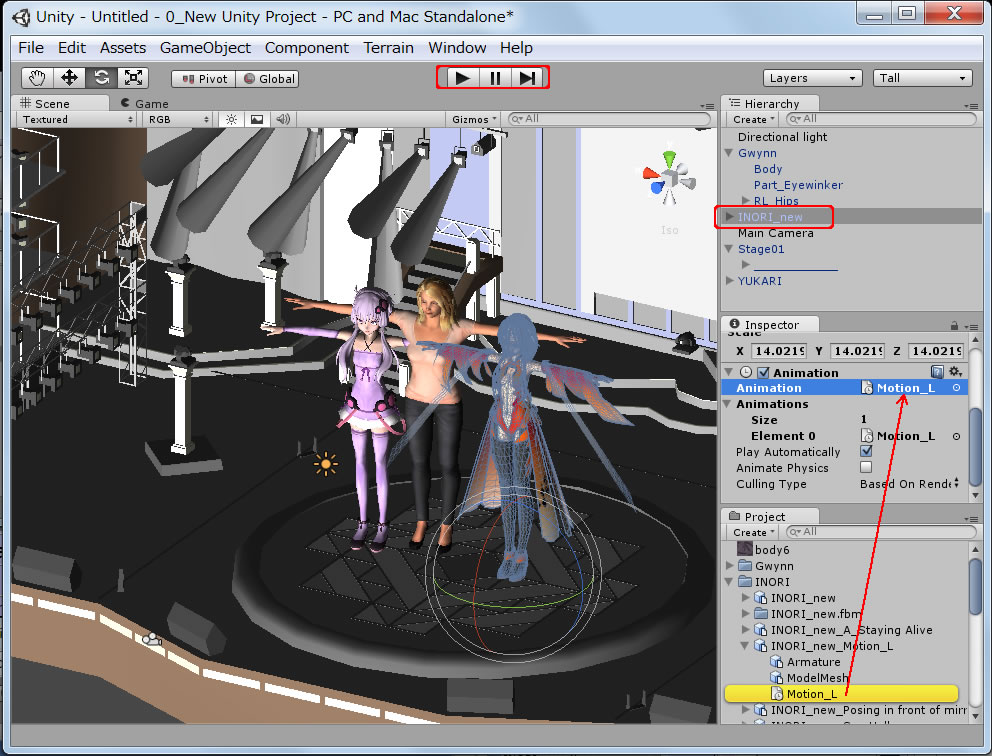
10.5 |
Locate Models into the Scene first, select a Model and drag a Motion clip to Animation Clip indicator slot as shown below. |
| |
When a motion is assigned to a Model, Scene must be at reset mode (Models to be all T-posed). |
 |
10.6 |
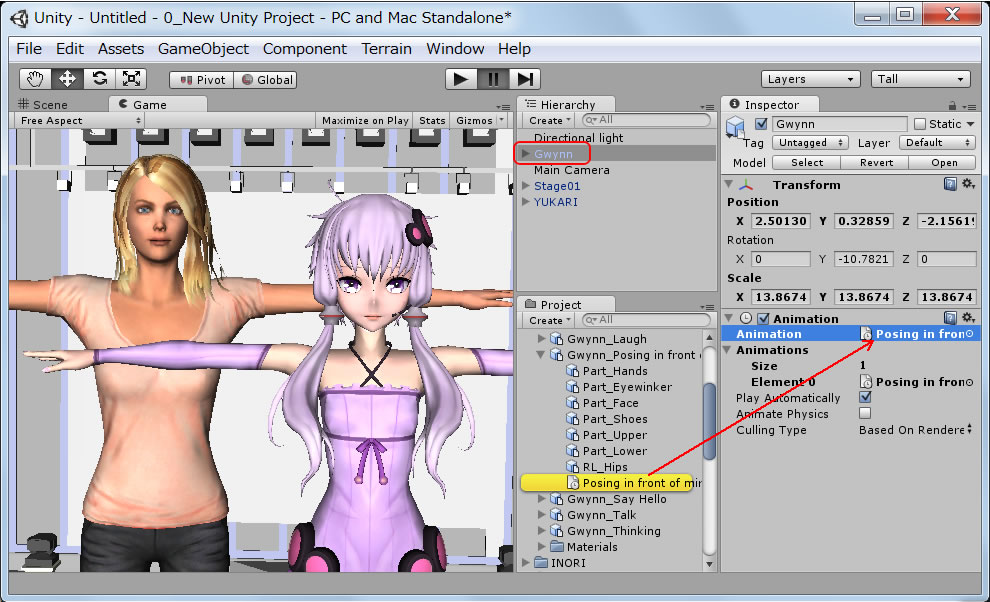
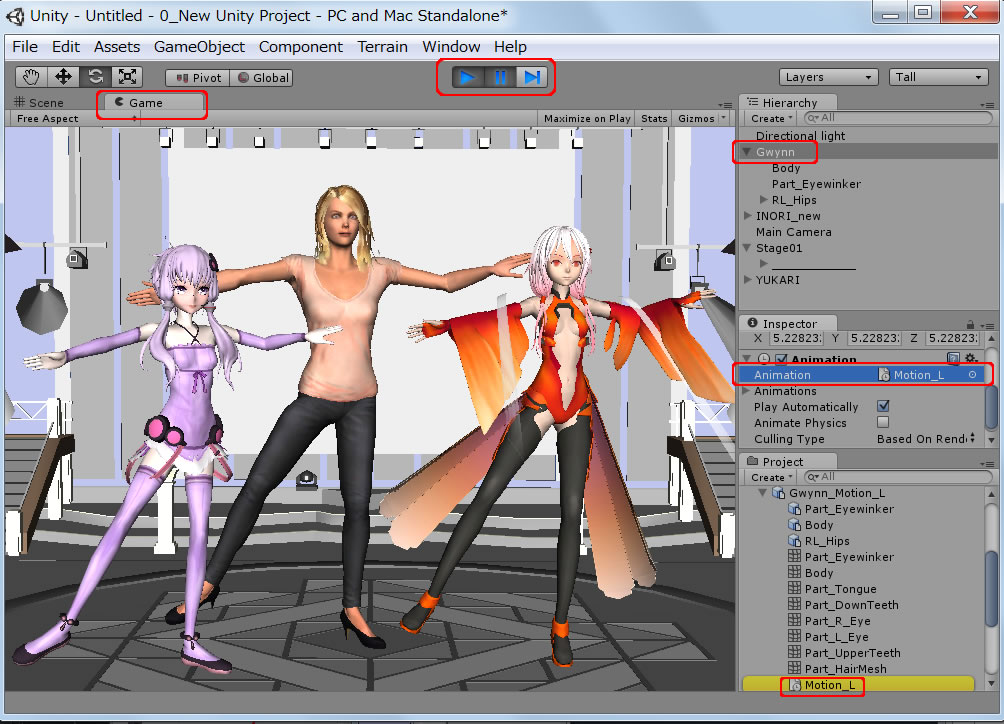
Add the Custom Motion to Gwynn and Export the Animation only. |
| |
|
10.7 |
Confirm that this Custom motion is added automatically to the Gwynn date in the Project view.
|
| 10.8 |
Play the Custom motion, use Play button to play back. |
| |
When stopped motion, frame by frame step forwarding is possible..
 |
| |
|
3DXchange5 Pipeline Test Series 9: MMD Model to Unity-1st step
2012.9.15 (Revised 10.20) by Hirospot (Personal Site) |